Tuesday, July 20, 2010

Etsymetal's Ring a Day Project goes to SNAG!!!


EtsyMetal's Ring a Day SNAG Exhibition Announcement

Colleen Baran's 1/365 Ring a Day


EtsyMetal is pleased to announce that the Ring a Day Project has been accepted as an exhibit for the Society of North American Goldsmiths (SNAG) upcoming Annual Conference in Seattle, Washington. The EtsyMetal team has partnered with the PUNCH Gallery for this exhibit. “RAD, a Ring a Day for 365 days” curated by Colleen Baran, Shannon Conrad and Sara Westermark will run from Thursday, May 5 to Sunday, May 29, 2011. Other members of the curating committee include Kathryn Cole, Nina Dinoff, Nina Gibson and Victoria Takahashi.

Represented work will range from ephemeral and conceptual art rings to functional jewelry. The exhibit will feature 365 rings, representing a ring a day and encompassing the full span of the year. The layout will also include photographic documentation of select temporary and conceptual art rings. Rings will be chosen by the EtsyMetal curators and will illustrate the highlights and accomplishments of many hundreds of international members, selected from over 10,000 rings.


The Ring a Day project (or RAD) is an open challenge to metalsmiths and other artists across the globe to make one ring a day, out of any material, for the entire year of 2010. The genesis of the Ring a Day project is based on an exercise taught by Ellen Wieske at Haystack. The Flickr project, which was initially proposed by Nina Dinoff, was intended as an EtsyMetal team challenge to set a daily routine of exploration and an experiment to see what could develop over the course of a year.

On a daily basis, the rings are created, photographed, and posted to the Ring a Day Flickr photo group by each participant. The majority of the artists represented here have discovered this project through social media networks such as Flickr, EtsyMetal, Etsy, Twitter, Facebook, blogs, and of course word of mouth. This project reflects a population of metalsmiths and jewelry makers who are facile with current online technology.


Shannon's Conrad's 200/365 Ring a Day


Visit the public RAD group and join the project-

http://www.flickr.com/groups/rad2010/


For more info-

http://ringaday2010.blogspot.com/


Punch Gallery in Seattle, Washington


Monday, July 19, 2010

How to make a simple wire claw / prong setting.


Ok, deep breath...it CAN be done. You CAN make your own claw setting. There are lots of tutorials for bezel settings, and those settings can certainly contain a faceted stone, but sometimes a little more light and colour will show off the stone better. Below is an "x-wire claw setting", containing an an Aventurine CZ. It's my favourite setting because it's barely-there. I was taught how to make this setting by my tutor at Central Saint Martins, way back in 1990. I have added my sketches just to clarify the photos.


Of course you can buy claw settings, some are nasty, some are nice. If you can learn this setting I'm showing you here, then you'll find it versatile because although I'm showing you how to make a specific shape and size, once you've made the setting you will understand that the shape can be any shape. The size can be any size (scale up the diameter of the wire accordingly). You could certainly make this setting with 6 or even 8 prongs for larger stones. Make this first, then you'll understand.

1. I'm using a round, 5mm CZ and 0.5mm round wire. Use hard solder throughout the process.


2. Put the stone upside down on a flat surface and make a circle of wire (jumpring) which sits on the stone just below the girdle (widest part of the stone). You can see the jumpring is the same width as the girdle. Take the circle off the stone and solder it closed. 

3. Now make another jumpring which exactly fits inside the 1st one you made.

4. Here you can see how by making one circle perfectly fit inside the other, the gap between the 2 circles when they are on the stone is just right. The Culet (bottom pointy bit) is not protruding beyond the smaller ring.

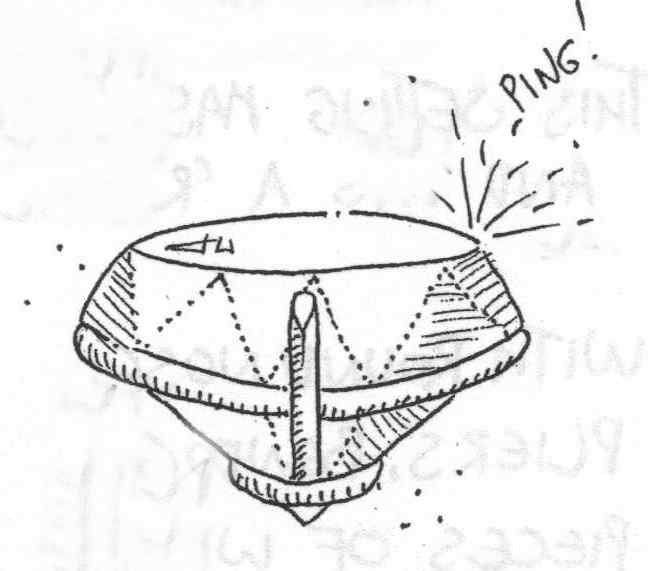
5. Now make a number 4 that is at least twice the size of your circles, as above. This number "4" is your cross, but made from one piece of wire instead of balancing 2 bits of wire together...much easier.

6. Use a punch with a cross filed out of it to gently punch the centre of your "4". This will squash the wires slightly where they overlap, so that they are no longer one-on-top-of-the-other and instead, on the same plane. If you punch too hard, you'll sever your wires and you'll have to start again.

You can make the punch with a big cheap nail from a hardware store (cheap ones are not hard strong steel, and therefore easy to file), just file the top flat with a large flat file, then use a triangular needle file to create your cross grooves. Clean all steel off your files thoroughly before you use them with silver again, or keep those files for steel only...otherwise particles of steel will corrode your silver when it's heated and your pickle will turn into a copper plating solution...all silver will go pink.

7. solder the "4" / cross together at the central overlap where you punched. Now, place your larger jumpring on one side of your cross, dead centre, and flux, warm up to set in position, place fluxed solder on each branch of the cross next to the jumpring and carefully solder into position.


8. Pickle the setting. Turn it over and solder your smaller jumpring onto the other side, dead centre as above.


9. If you are going to solder your setting onto a piece where you will be able to see under the stone setting to let light through, then DO NOT SAW OUT THE MIDDLE JUST YET. If as in my ring at the top of this post, you are soldering the setting onto a piece that will back the setting then you have to saw out the middle cross of the setting now.

Notice I have also used a half-round file to file the inside neat and to taper the interior form to accept the sloping form of the stone. It is more difficult to solder the setting into place if you have sawn out the centre cross, as the prongs (claws) are now not braced together. If you can saw out and file up after the setting is soldered onto the piece then there's less risk of the setting collapsing if you aren't sharp enough with the soldering.
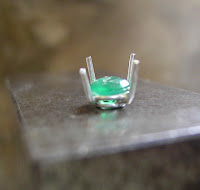
10. Here is stone in setting so far. Now, bend up the prongs with pliers (you could saw a little nick into the wire prongs where they touch the circle, so that it bends up easier if you want). solder each prong to the top jumpring with tiny pieces of solder. If you've used a little too much solder already on the piece, then just flux and what is already there, will flow.

11. Next, use flush wire cutters to trim the prongs down so that when they fold over, the tips will be resting on the side of the stone above the girdle, but not on the face ("table") of the stone. Shape the tips neat and tapered by filing. In this picture you can see that I have made my top jumpring so that it slightly frames the stone, but traditionally you would have none of it showing at all...it's up to you.

12. Solder your setting onto the piece with Medium, or if you aren't overly confident, with Easy solder. You might want to use a very fine paintbrush and apply rouge paste or some other solder-stop, to protect the solder joins on this piece. Whatever you use, don't get the solder-stop anywhere you are about to solder. I didn't use any solder stop when I soldered this setting onto the ring. I soldered with Medium solder and heated the piece mainly from underneath, bringing the heat to the top, close to the setting at the last possible second. As soon as the solder flashed I pulled the heat away at top speed.

12. When the setting is in place and everything is polished and ready to go, pop your stone in the setting and with your pusher (one of these above), push one prong over gently, then the opposite prong over gently then the other two. Go round the prongs again, working opposite prongs so as not to skew the stone in its setting, bit by bit until the claws are making good contact with the stone. I keep the flat surface of my pusher gently roughed with fine emery paper, so that it doesn't slip. You can burnish or polish the tips of the prongs afterwards for a shine with a buffing stick. Do not use a buffing machine, the mop will catch the prongs.

I really hope this is helpful. It's hard to find a how-to for this simple setting these days and it is a skill being lost. If you prefer to set your faceted stones with a bezel, then see my tutorial here. Check out the other EtsyMetal tutorials by clicking on Tutorials in the tag menu on the right-hand side.

Sunday, July 18, 2010

Etsy Metal Finds


One of the most pervasive icons of summer seems to be the moth. They flutter by, in search of light and a mate, with only a short time to live. Moths range drastically in size and nature, but they all seem to share that bit of magic that comes with being night dwellers. May the moths in your life be beautiful and bright!

From left to right:

Alter Ego Tank by Erin Alexandra Klym

La Femme Fatale Spider Pillow by Branch and Birdie

Swarm of Golden Moths original watercolor by Golly Bard

Saturday, July 17, 2010

EtsyMetal Weddings


Many of our members have been busy making beautiful wedding bands and engagement rings. We even started an entirely separate blog to showcase these fabulous designs and the designers. If you haven't taken a look, please do so! Not only are there some great images, but our main blogger Andrea is a wonderfully witty writer!

Check it out here!

Friday, July 16, 2010

Work of Art Challenge: Episode 5: "Art That Moves You"

Episode 5: Art That Moves You
Air date: June 30th 10pm PST; Bravo TV

In this episode 5, the contestants are given a fleet of cars and told to drive them through New York City, ultimately arriving at the Audi Forum. An artist’s city often serves as a source of inspiration, and for their elimination challenge, the artists must create a piece of work that is reflective of their experience driving through the streets of Manhattan.

EtsyMetal Jewelry Translation... Please make a piece that involves "cars" somehow!

Inbar says, "I love car wheels! For the head of the screws (I couldn't decide on the color,
I used blue topaz, amethyst, peridot. garnet and citrine."


Kira says, "For episode 5 the theme of our challenge was "cars". I kept thinking "road trip..."


Victoria says, "For this challenge my dear sweet partner says, "why don't you make an engine?" I said, "No."  So he begins to show me all these car parts and I stop him when I see this freaking gorgeous Hilborn fuel injector stacks. Please let my heart be still, I do not think I did these beauties any justice but they definitely were all my inspiration for this piece. Their wonderful shapes is a favorite of mine so how could I not indulge?The little stacks in my ring wiggle around in the setting. Materials: Sterling Silver, Oxidized and Fabricated"


"Thank you all for reading our team blog!"
Quote from Bravo TV: "The remaining artists are challenged to create a large-scale, outdoor installation piece. The artists must put egos aside and collaborate effectively in order to create a public art masterpiece in just two days. The challenge culminates in a public viewing."

Please check on back to see our collaborative creation for Episode 6!
We will be making a "one-of-a-kind" cluster of charms necklace that will be available in our EtsyMetal team shop.

Scheduled to be posted on Thursday, July 22nd!


Thursday, July 15, 2010

Charm Swap 6

Hi again

Time is short my friends. I have two new hints of what will be on our next swap.
Erga has finished her prototype: "'I'm calling it "Opposing Forces" - Partly inspired by the "Chaos/Control" double-sided Kandinski in "Six Degrees of Separation," but also a reflection of the competing design forces in my work (geometric vs. organic), and meant to allude to a window and clouds, sort of an indoor/outdoor, structure/nature thing. Or just interesting shapes cut out and hammered together"


Meg from SimplyMega after finishing her prototype began full time manufacturing her 22 charms!
"Each charm will be different as they will be fabricated rather than cast. Each will contain silver wire and a copper starfish.:


Till now we have 3 charm out of 20 !
I can't wait to see what we are going to have in this charm swap! Really! I am so excited !!!

Sunday, July 11, 2010

Etsy Metal Finds


Summer has finally arrived in the Northwest. While other parts of the country were suffering through heat waves (and still are), our summer doesn't 'really' start until after July 4. That's the story, anyway. And all this heat gets me thinking about....the beach! Oh, to lounge seaside listening to waves, shrieks of laughter (or because the Pacific Ocean is so cold!), and feel the heat of the sun.
Of course, one would need.....

A lovely beach towel....

A striking bathing suit....

And some great shades.

From the Top:


Related Posts Widget for Blogs by LinkWithin
 
>