There is a fabulous series on PBS called Art 21: art in the twenty-first century. Some friends of mine had told me about it and I already had it in my Netflix Que! I've just started with the first season but am already totally captivated. Each episode highlights a few artists and gives a brief snapshot of who they are in their creative process.
You can check it out on the PBS website, or if you have netflix, you can add seasons 1 thru 5 to your Instant Que and watch them on your computer (or tv!).
This weeks finds were inspired by cycling. As the weather warms up in the Northern Hemisphere, more and more people are hopping on their bikes as a way to get around. Here are a few tools and accessories to go with your lovely biking adventures!
Last weeks' TV challenge was to create a piece that incorporates the the theme of one of four New York City Neighborhoods. All three participants chose Chinatown!
I had framed picture I took last summer in NY china town - Mother carrying her son on her back - Both were very colorful as china town. I made the frame from sterling silver etched with NY skyline and I LOVE NEW YORK on it , the bezel remind me NY high buildings. I used anti reflex glass that made me hard time taking this picture :-)
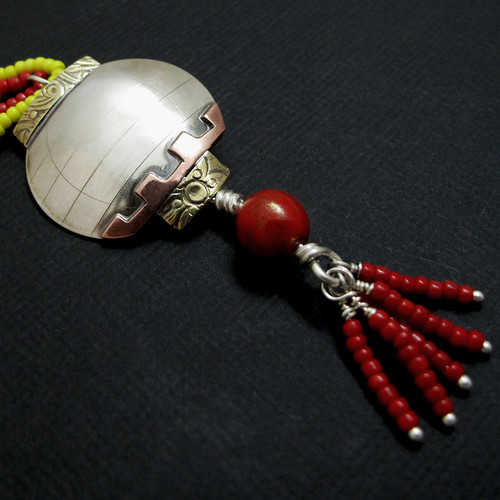
I've never been to New York, but I've been to Chinatown San Francisco and other areas. This necklace is a tiny Chinese Lantern, made from sterling silver, patterned brass and copper. The beads are vintage glass. I'm re-thinking the yellow - it's a little bright, but I like piece!
Episode 10 :
"Hey, That's My Fabric"
"Project Runway" Season 7 Episode 10 (Hey, That's My Fabric). Guest judge is Vivienne Tam. Air Date: 03/25/10. In this episode, the designers' challenge was to design their own fabric to use for their look.
Have fun and we will see you next week, we are very much looking forward to seeing all your creations! *click to watch Episode 10:
Our Jewelry Design Challenge: Please design and create a piece which incorporates
Pattern! Like the prints that were made by the PR contestants, we can pattern our materials. The pattern must be handmade.
**guidelines for guest participants:**
Please read this every week as there may be small updates and changes. The pieces you submit must be pieces that are made specifically for that weeks challenge. Then post your links in this weeks comment area, they will be retrieved as they come in before the deadline.
*We only are accepting guest submissions from our blog comment area at this time, insert your links there. Then please cross-post this to your Blog, Flickr, Etsy, etc. And tag them with "Project Runway Season 7 Episode 9." Currently we will post your name with a link and a picture of your piece on our blog. The new deadline for guest submissions will be Friday at 6 pm, Pacific Standard Time. The new blog posts and the new challenge will go up the weekend after the new episode airs.
We're rounding out Etsy's Euro Week with two more of our new international members - fluxplay and inbarbareket!
Maria Whetman - Fluxplay
Maria Whetman aka Fluxplay - In my mothers’ photo album, there are lots of photos of me from as young as 4 peering into holes and picking things up off the floor, I liked to wander the housing estates I grew up in looking for snail shells, rusty metal and interesting rubbish and pretty pebbles. I grew up loving to collect the things that I found around me and making small artworks from bits of card and stuff reclaimed from around the house. That evolved as I got older into making small things that were about found objects then making small things that incorporated found objects…and here we are today. My interests in images, old packaging, old advertising, architectural details, history, textures and patterns are evident in my sketchbooks which in turn feed into my jewellery designs falling into the realms of narrative jewellery. I like my pieces to evoke memories and moods for people or perhaps feelings of curiosity for the story within the piece. There’s never enough time to make-up all the ideas I have, plus I love experimenting too much which is why I named my jewellery persona “fluxplay”, a play on words and a reference to change and movement.
Inbar Bareket
Inbar Bareket - To make the long story short I will begin here: In the last 10 years I was the system (IT) manager of a high-tech software company. About 18 month ago I decided that it's now or never-- I need to do something with my soul-- and I began studying jewelry making and I fell in love.
My jewelry is all created by hand. Most of them are one of a kind pieces. I work with precious metals, especially gold and silver, and precious/semi-precious stones. I usually don't plan what I'm going to make - I just feel it and go with my emotion. I love the stones and the metal - I feel they are a part of me, and my hands are doing the rest.
I was enchanted by the tools offered by N. C. Black Co in the vendor room at the Society of North American Goldsmith's conference. N. C. Black Co. specializes in micro forming tools for shell forming, raising, and spiculums by offering a full range of hammers, mallets, stakes and forming blocks for metalsmiths.
These tools are available only at ALLCRAFT TOOL Co. and are 100% made in the United States. I couldn't find a website address for Allcraft, but I do have a phone number to call for the tools, (212) 279-7077. People were constantly at the booth trying out various hammers. I don't remember a time when they had an empty booth!
They also had handouts available to show how each hammer was used to create these different micro forms. I decided in the interest of time that I would visit them after I get home since they are located in North Carolina. I am planning to travel to the Sawtooth School to get a lesson on these beautiful tools.
This versatile setting allows light behind the stone and is smart and minimalist.
You can use it to set stones of opaque or translucent quality.
It works for most flat-backed stones as well as faceted stones, cut stones, or smooth cabochons.
You can make the inner bezel from thicker metal if your stone needs a wider ‘seat’ to sit on.
You can make this setting for most shapes of stones, with a little practice.
You can incorporate this setting into virtually any kind of jewellery, from rings to necklaces…it all depends on your own ability and skill level.
1. Measure the height of your stone with dividers or a strip of paper then allow a few millimetres more, as I have done here. You may notice that my dividers live in a damp environment and are in dire need of oiling!
2. Mark out a strip of metal to the width that you have set in step 1. The length needs to be long enough to wrap around the circumference of your stone but allow much more to play with. The metal needs to be really thin, thin enough that you can easily cut it with scissors, thin enough to eventually rub over your stone with ease, but not so thin that it would quickly melt when you solder it onto your piece of work….this will vary according to your ability and how bulky the item you are soldering onto is.
3. Cut it out with scissors or snips. Now use some narrow flat-nose pliers to bend the strip into a square for a square / rectangular / triangular etc shaped stone. Use round or half-round pliers for round, oval etc stones, or a combination of pliers for unusual shaped stones. Match the strip up to the stone to check you are creating the right shape. Gently anneal the strip if you’ve work-hardened the metal with over shaping and re-shaping.
4. You can see here that I’ve made 2 of the corners for this faceted square CZ stone and I’m matching the strip up to stone before marking in pencil where the next bend needs to be. Decide when looking at your mark at this point, whether you are going to place your pliers on one side of the line, on the line, or to the other side of the line….it can make a big difference to how your setting looks, but notice how many stones are not as geometric and perfect as they may at first appear to be!
5. Here you can see the finished square next to its owner. You may notice that the stone is narrower across the lower length…it is not as square as it first appeared.
6. Here is the stone in its Bezel that we have just made. It’s a snug fit. The bezel was soldered closed with hard solder and a careful, small flame on a crème bruleẽ torch. Now make another one of these squares, but in a thicker metal, and make it NOT to wrap around the stone, but to fit snugly inside the 1st square (bezel). Make it the same height as your stone. It will be the seat your stone sits on.
7. Above you can see the stone, the bezel (1st square) and the inner seat (2nd square), side by side for comparison. Solder the ‘seat’ closed now, or in the next step.
8. Ok, now solder the seat into the bezel with hard solder. You may choose to be soldering the ‘seat’ closed at the same time, all in one go…it’s not hard, it will happen without you even having to try if your inner square fits snugly in your outer square….hang on though, before you go for it, just read the next step (step 9).
9. You are looking at the bottom, the ‘base’, the underside of the setting. Excess ‘seat’ is protruding (we’ll remove it later), but this protrusion is handy for placing your solder against. If you place your solder inside the setting then you are in danger of inadvertently ruining your nice neat, crisp edged seat with excess solder or possibly solder residue from insufficient heating, the stone wont sit happily. By soldering from underneath, you allow for your mistakes or novice ability…and no one will know!Make sure your stone sits so that enough of the outer bezel protrudes above the 'girdle' of your stone, for you to be able to rub over.
10. And here is the finished setting. Snip and file away the underside so it’s neat. Solder onto your piece of work, clean up/polish etc, place your stone in. If your bezel isn’t that thin, then you might want to file the top 1mm or so, in order that it pushes over easily. Push each side over with your Pusher, 1st one side, then the opposite and so on, all the way around. Next, for a tight fit that avoids ‘wobbly stone’ use your pusher to carefully push down on the very lip of the bezel. Just a bit of pressure is needed to ensure a tight fit. The edge of the lip effectively curls over and ‘bites’ into the stone…but not that you can see it, see the illustration here…..;
Finish by rubbing the edge with your Burnisher, all the way around, always rubbing in one direction so as not to stretch the metal, just enough to harden, too much will wrinkle it. This hardens and shines up the setting nicely. Here you can see two of my brooches which each feature a little set CZ stone, one square, one round. I use this setting also for cabochons.
Copper flame earrings. I gave the copper a dirty fire patina and added a silver accent.
Episode 9 : "Takin' it to the Street"
"Project Runway" Season 7 Episode 9 (Takin' It to the Street). Guest judges are Francisco Costa and Molly Sims. Air Date: 03/18/10. In this episode, the designers paired up for the challenge to create 2 looks inspired by distinct NYC neighborhoods.
Have fun and we will see you next week, we are very much looking forward to seeing all your creations! *click to watch Episode 9:
Click on the names of the neighborhoods above for some photos of those areas for inspiration! Have fun with your New York State of Mind!
**guidelines for guest participants:** Please read this every week as there may be small updates and changes. The pieces you submit must be pieces that are made specifically for that weeks challenge. Then post your links in this weeks comment area, I will retrieve them as they come in before the deadline. *We only are accepting guest submissions from our blog comment area at this time, insert your links there. Then please cross-post this to your Blog, Flickr, Etsy, etc. And tag them with "Project Runway Season 7 Episode 9." Currently we will post your name with a link and a picture of your piece on our blog. The new deadline for guest submissions will be Friday at 6 pm, Pacific Standard Time. The new blog posts and the new challenge will go up the weekend after the new episode airs.
Etsy is having a Euro invasion this next week - highlighting fabulous European shops. As part of our weekly mini features for our new members, we kept with that theme and are featuring two of our many new international members: mariagotijoyas from Spain and erga from Israel.
Maria Goti: All the pieces I create are designed and handmade by me. I love improvising with metal and making one of a kind jewels with unique stones. I enjoy trying new techniques, textures and finishes and if I could I would never repeat a piece as I easily get bored when I have to do the same pieces many times. Because of that I try to design and make new collections quite often. Sometimes I feel a little bit frustrated as I don't have time enough for making real all the ideas I have boiling in my head. My favorite in textured silver with an oxidized finish. I love the contrast that it makes with gold, polished silver or stones.
Todas las piezas que creo están diseñadas y llevadas a cabo a mano por mi. Me encanta improvisar con el metal y crear piezas únicas con piedras especiales. Disfruto probando nuevas técnicas, texturas y acabados. Si pudiera nunca repetiría una mismas pieza ya que enseguida me canso de hacer las mismas piezas una y otra vez. Por esto procuro incluir nuevas colecciones a menudo. A veces me siento un poco frustrada por no tener el tiempo suficiente para realizar todas las ideas que se cuecen en mi cabeza. Mi preferida es la plata texturizada con acabado en óxido. Me encanta el contraste que produce con el oro, la plata pulida o las piedras.
Erga: I have always loved metals and stones. Since childhood, I have been fascinated by the treasures that mother earth supplies us with. Only recently did I pick up a tool box, and begin working with metal. It was like coming home, at last. After years of working in front of a computer, creating virtual products that provide virtual services, creating a tangible product with my own two hands has a particularly sweet reward.
I love the technical challenges of metalsmithing. I enjoy resolving the tension between form and function. I get a thrill from using ancient techniques, to create wearable art, which could still be in use hundreds of years from now.
My designs tend towards the geometric, though I'll accept influence from anything visually pleasing. The tools and materials often guide me in a given direction, and often I see jewelry in my dreams, or in those minutes between sleep and consciousness.
Catherine says, "I went and visited Hippo Hardware, here in Portland, OR, and found some wonderful quirky finds.
I wasn't sure I would be able to create something solely from hardware store finds, but one thing I have learned about myself recently, is that I am a problem solver. And happily, I figured out a way to make it work! I'm very happy with this piece and fully intend on making more. Keep an eye out! "
Victoria says, "This week I kept it simple. On the show, there was a horrific hot pink string washer bathing suit made. I felt he disrespected the simple washer and so i felt the need to made this piece to honor the "washer" and its sweet perfectness as individual roundly object thingamajigs."
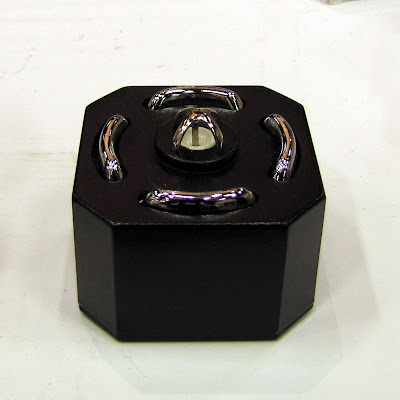
Inbar says, "I was schlepping the "Home Center" to find cool stuff ! Suddenly saw these beautiful metal support for glass shelf (I saw "beads" in my imagination). I than found this rubber cord (for jewelry) 5mm in diameter, and I ended them with sterling silver findings."
Kira says, "I formed plumber's copper tubing to make this hollow coral bangle."
5~ Sara Westermark ~Washer Necklace Sara says, "Electrical Copper, and found washers at the Habitat store."
Episode 8: "The Four Elements of Fashion"
"Project Runway" Season 7 Episode 8 (The Elements of Fashion). Guest judge is Roland Mouret. Air Date: 03/11/10. In this episode, the designers' challenge was to create a look inspired by "one" of nature's four elements.
~Fire, Water, Earth or Air~
Have fun and we will see you next week, we are very much looking forward to seeing all your creations! *click to watch Episode 8:
**guidelines for guest participants:**
Please read this every week as there may be small updates and changes. The pieces you submit must be pieces that are made specifically for that weeks challenge. Then post your links in this weeks comment area, I will retrieve them as they come in before the deadline.
*We only are accepting guest submissions from our blog comment area at this time, insert your links there. Then please cross-post this to your Blog, Flickr, Etsy, etc. And tag them with "Project Runway Season 7 Episode 8." Currently we will post your name with a link and a picture of your piece on our blog. Remember, the rigid deadline for submitting your link is always on Fridays, 12 noon, Pacific Standard Time. The new blog posts and the new challenge will go up the weekend after the new episode airs.
During the SNAG (Society of North American Goldsmiths) conference I frequented the vendors' rooms and investigated new tools on the market. I fell in love with some of these and thought that you might too.
Knew Concept Saw or the "red saw" from Rio Grande
I was told by a friend, who uses a lot of piercing in her work, that this "red" saw was the best she ever used. I tried it out for myself at the Rio Grande booth and I was very impressed. You may ask, why is this different from other saws on the market? First of all it is a lot lighter. You feel as if you are barely holding on to anything. But the most important part is how firmly it holds onto the blade. This saw features a fine tuning adjustment at the top of the saw frame that allows to tighten further once the blade is in place. What this means to you is that the blade is very tight and has less drag (caused by the loosening of the blade as you cut) giving you more accuracy in your cutting. I am ordering one or two of these!
Bill Fretz Hammers and Stakes
I got to meet Bill Fretz and ask many questions about his line of hammers and stakes. I am interested in looking into the ring doming set of bench stakes. I was thrilled to see how each one of these stakes is used by Bill Fretz himself. I regret that I didn't get a picture. It was beautiful to see all the hammers and stakes lined up.
Swanstrom Disc Cutter
Mark Nelson is the Rio employee who is in this youtube instruction video, recommended some tools for me to add to my "want" list. He suggested a hammer handpiece 15-D for setting cabs and a Bench Mate kit. The folks at Rio were helpful, easy going and nice to talk to, and they are truly committed to service.
After reading the Susan Kingsly book on Hydraulic Die Forming, I am saving up for a 20-ton Potter hydraulic press from Otto Frei. I got to meet the maker, Kevin Potter, who makes his own presses and die plates at his house.
Kevin Potter with his "Potter" Press at the Otto Frei Booth
Kevin Potter and his 20 ton hydraulic press
Handmade Stakes and Forming tools by Potter
Custom Dies for the Potter Press
Otto Frei Electric Sparker
I already have one and I love it! This is a must have for all benches!
In this tutorial, Lena Marie Echelle will show you the method and tricks she uses for making a simple locket hinge out of sterling silver.
Here is a list of the tools you'll see in use: Jeweler's saw and fine blades Needle files (triangular, round, flat) Awl or scribe Calipers or dividers Tube cutting jig Propane torch and solder
I have already fabricated a sterling silver bezel mount for a domed, heart shaped enameled piece of copper; the back is a slightly domed sterling silver piece with the same profile as the front. All work on the locket besides riveting the hinge pin is done prior to setting the enameled piece, but the fit for the bezel needs to be close from the beginning. Here, I am checking the fit one last time before starting to work on the hinge.
If you want to be able to catch a photo in the locket, it is useful to have a strip around the inside. For my locket, this strip also functions as the back of the bezel for the enameled heart, and it gives strength and thickness to both sides.
Before starting to construct the hinge, make sure both sides match up evenly, all the way around. Pick a flat part of the piece for the hinge. Make sure the placement of the hinge will complement the design of the piece, and keep in mind that the clasp for the locket usually goes opposite the hinge. Once you have located the where the hinge will be placed, start to file a groove for the hinge using a triangular file.
The tubing I am planning to use is purchased, but you can also make your own. Either way, the walls should be at least 24 gauge, and, if silver, no smaller than an 18 gauge wire should be used as the hinge pin. The hinge pin should fit snugly in the tube to avoid wiggle in the hinge.
After the groove has been well established with the triangular file (the cut should be no wider than the tube you are planning on using for the hinge) switch to a round needle file in order to match the shape of the tube. Once the groove is deep enough for the tube to rest securely (the depth of the groove should be nearly half as deep as the outer diameter of the tube in order to make sufficient contact with each side of the locket), measure the approximate length of the groove. Divide this number by the number of knuckles you will use in order to establish the length of each knuckle. I cut these a little long; the outside knuckles can be filed down to size if they stick out a little. My smallest hinges are about 6mm long, enough for three knuckles of 2mm each. This hinge will be about 9mm long.
It’s easier to cut a straight line on tubing if you use a tube cutting jig. Most jigs also have a stop which makes it easy to cut equal lengths. I drilled a hole in my bench pin that the handle of the tube cutting jig fits into. This way both hands are free for holding and cutting. It is very important that the edges of the tubes be cut absolutely square.
Use your fingernails or a light touch with a file to knock off any burs on the edge of the tube after cutting. Line the knuckles up to make sure they are cut straight, and compare them to the groove in the piece.
Paint both locket halves with yellow ochre or other solder stop. Note that I haven’t even cleaned the metal of the locket since soldering the inner strip to each half. Since the metal where the tubing will be soldered is clean from filing, having the rest of the piece oxidized and dirty actually helps to keep the solder from running where you don’t want it. Just make sure the tubing and solder are clean, and don’t paint solder stop on any part of the filed groove.
Secure both halves together with iron wire, lock tweezers, or a third hand, and flux the groove.
Using an atmospheric air and propane torch, I start to gently heat the piece. Meanwhile, I place the fluxed hinge sections into the groove using tweezers and my soldering pick. I push them together and make sure they are straight. It is critical that the knuckles are aligned properly at this stage.
Before soldering, I turn off the torch and inspect the piece from every angle to make sure the knuckles are in place correctly and that the locket halves haven’t moved, and I cut three tiny pieces of solder. It’s important to cut very small pieces so that solder doesn’t flow where you don’t want it. You can always add solder later.
Place two of the solder pieces, one on each of the two knuckles that are attached to the back of the locket. Start to heat, and use a solder pick to tap the solder or the knuckles into place if they try to move when heat is applied.
Before soldering the middle knuckle to the other side, quench the piece and make sure that the two knuckles on this side are soldered properly. If the middle joint accidentally got soldered to the back side, reheat the piece gently and use tweezers to lift it off carefully when the solder flows. Saw off a length for a new middle knuckle if the original gets marked or deformed while removing it. Once everything is ready, paint the groove between the two soldered knuckles with solder stop (yellow ochre) and rebind the two locket halves. Flux the front side, set the middle knuckle in place, solder with remaining tiny piece of solder.
Pickle the piece, and try out a hinge pin. Before permanently placing the hinge pin, remember to do any final soldering on the piece. This is the time to make the clasp for the piece, as well as solder on a bail from which to hang the locket if you haven't yet done so. In the case of my locket, I also need to set the enamel heart before I can rivet the hinge pin.
Inspect the piece closely to make sure that all three knuckles are firmly soldered. You can file the ends of the hinge to flatter your design.
If you want the pin to be flush with the outside of the hinge, widen the ends of the hinge. You can use a file or an awl. Either way, the goal is not to remove metal, but to widen the outer edge by twirling the tool.
I like to draw down wire until it is just the right size to fit into the hinge. You can also file down a wire that is a little too big. Once it is the right size, insert the wire and saw off. I like to saw the wire while it is in the hinge. I use a light touch and don't saw all the way through (to avoid marring the locket). Instead, I break the wire off with my hands.
Using a triangular file, I cut a small groove in each end of the wire. This will be where the wire expands during riveting. It will also make the ends of the wire look like little screw heads.
To rivet, I use a light touch with a small hammer. The hinge is complete!

![[Most Recent Quotes from www.kitco.com]](http://www.kitconet.com/images/quotes_special.gif)


 These tools are available only at ALLCRAFT TOOL Co. and are 100% made in the United States. I couldn't find a website address for Allcraft, but I do have a phone number to call for the tools, (212) 279-7077. People were constantly at the booth trying out various hammers. I don't remember a time when they had an empty booth!
  They also had handouts available to show how each hammer was used to create these different micro forms. I decided in the interest of time that I would visit them after I get home since they are located in North Carolina. I am planning to travel to the

![clip_image002[4]](http://lh5.ggpht.com/_kTKZjmfj-mE/S2vf8h0XCKI/AAAAAAAAADo/Q63BGdKRqpw/clip_image0024_thumb3.jpg?imgmax=800 "clip_image002[4]")
![clip_image002[6]](http://lh5.ggpht.com/_kTKZjmfj-mE/S2vf9EgZZSI/AAAAAAAAADs/4TJUe2-S_OQ/s1600-h/clip_image00263.jpg "clip_image002[6]")
![clip_image002[8]](http://lh3.ggpht.com/_kTKZjmfj-mE/S2vf-FqrYjI/AAAAAAAAAD0/BOBAhqhS4QY/s1600-h/clip_image00283.jpg "clip_image002[8]")
![clip_image002[10]](http://lh5.ggpht.com/_kTKZjmfj-mE/S2vf-yr6jfI/AAAAAAAAAD8/8oe1A9ksiiA/s1600-h/clip_image002103.jpg "clip_image002[10]")
![clip_image002[12]](http://lh5.ggpht.com/_kTKZjmfj-mE/S2vf_6a6EYI/AAAAAAAAAEE/sjxemzkyxHw/s1600-h/clip_image002123.jpg "clip_image002[12]")
![clip_image002[14]](http://lh6.ggpht.com/_kTKZjmfj-mE/S2vgAhHEQDI/AAAAAAAAAEM/NaOz2gmqRLA/s1600-h/clip_image002145.jpg "clip_image002[14]")
![clip_image002[16]](http://lh6.ggpht.com/_kTKZjmfj-mE/S2vgB5iPUDI/AAAAAAAAAKY/JQp8X7sTRTE/s1600-h/clip_image00216%5B1%5D.jpg "clip_image002[16]")
![clip_image002[18]](http://lh3.ggpht.com/_kTKZjmfj-mE/S2vgCmvN45I/AAAAAAAAAEc/HvX99eOwfCc/s1600-h/clip_image002183.jpg "clip_image002[18]")
![clip_image002[20]](http://lh5.ggpht.com/_kTKZjmfj-mE/S2vgDmp7jiI/AAAAAAAAAEk/uIwqWpGZdEs/s1600-h/clip_image002203.jpg "clip_image002[20]")
![clip_image002[22]](http://lh4.ggpht.com/_kTKZjmfj-mE/S2vgEfqDiqI/AAAAAAAAAEs/VseI_gdG-m4/s1600-h/clip_image002224.jpg "clip_image002[22]")
![clip_image002[24]](http://lh6.ggpht.com/_kTKZjmfj-mE/S2vgFGYi8II/AAAAAAAAAE0/MKG1hnrT7l4/s1600-h/clip_image002243.jpg "clip_image002[24]")
![clip_image002[28]](http://lh4.ggpht.com/_kTKZjmfj-mE/S2vgF0mJjfI/AAAAAAAAAE8/-RsQwuyItFo/s1600-h/clip_image002284.jpg "clip_image002[28]")
![clip_image002[30]](http://lh3.ggpht.com/_kTKZjmfj-mE/S2vgG3UAkoI/AAAAAAAAAKg/INervEaHgdE/s1600-h/clip_image00230%5B2%5D.jpg "clip_image002[30]")


.jpg)