Thursday, June 30, 2011

Charm Swap 8 - week 13

This week we have quite a few updates from the charm swap participants....
Erin from ErinAustin is on a roll with her charms! Last week it was folding and cutting the shapes and this week she has already made her settings! I love the little cut outs on the backs of the charms...they are really looking great Erin!


 Jen from JenLawlerDesigns  sent in this photo of her adorable little house charms. Jen says "I've been inspired by so many that are working with copper and brass that I decided to try out using it again. It's easily been over 10 years since I've used copper or brass. I hand textured the copper with a new hammer I have and then fabricated the pieces together. It's also my first batch from my new tumbler!" They look great Jen!


 Karla from KalraWheelerDesign has gotten some work done on her charms this past weekend. She says that she has decided to etch the backs of her bezels and seems to be pretty excited that she now has all of the etching done and the main circles of her bezels made! Way to go Karla!


Ruby from Iacua also has an update for us. She sent in a sketch of her idea and 2 images of the piece she has started to carve in wax. She plans to make a bell out of her blackberry charm. Since this is a first for her she is hoping the bell will really work when it's finished. It looks good so far! When she finishes the berry she will carve the clapper and is thinking of doing the berry in brass and the clapper in sterling silver. Ruby says she will send more photos as the berries progress. Can't wait to see them!


Until next time! ~Michele Grady

Sunday, June 26, 2011

Etsymetal Finds - hartleystudio finds

This week, instead of a traditional theme, I chose pieces I have fallen in love with over the years. Some are recent, others are from a long time ago. All are from fantastic Etsy artists. Enjoy!

Friday, June 24, 2011

Tutorial for making Cufflink fittings.

Cufflinks. Copper, reclaimed tins, oxidised.

Over the years I've used many forms of cufflink backs and never really been entirely happy with any of them. Pre-bought manufactured findings are nearly always in silver or gold and just don't suit my work with their clean, shiny finish and high-end look...... and are quite pricey. I've made solid arched fittings that have no movement (needs to be made from quite thick sheet) and solid arched fittings with tiny wire rivets (too much work when I'm trying to keep my work affordable and costs down). I've used short lengths of either my own hand-made chain or bought chain, but these always seem a bit...well, too pretty for my designs and awkward to solder on to the cufflinks. So I trawled through my books looking for another option and this is the one I chose, a "Swivel Back"...but with a few alterations. You could make yours highly polished or even stamp decoration onto the bars, in fact these backs would look great whatever your own style of jewellery is. Here is how I made mine;

First I straightened some 1.7mm wire (this could be between 1.5 and 2mm). I straightened it by rolling it under my mallet on a steel block, back and forth.

Next, I cut about 6cm of the wire and folded it in half by hand, before gently squeezing it together with parallel  pliers, keeping an open loop at the folded end. Repeat for the second cufflink.

I soldered the lengths together with hard solder, using a bit of binding wire to keep them nicely shut. Don't forget to remove the binding wire before you pickle...otherwise you'll end up with a copper-plating solution instead of an oxide-removing bath. These will be the Stems of the cufflinks.

Now for the Stops (the non-decorative element of the cufflink which sits on the inside of the wrist, though of course you could have 2 decorative elements for each cufflink). Sometimes my stop is just round wire of between 3 and 4mm, sometimes I make it square. Here I made some square wire by rolling through the grooves of my rolling mill and gradually reducing the gap with each roll-through. Pre-rolling mill days, I would have forged square wire with a creasing hammer then planished flat, or used plenty of oil, sweat and a square-hole draw-plate. When rolling down wire into a square profile, you have to obviously start off with a thickness of wire that's bigger than you want, to allow for the shaping.

I sawed the length of the stems down to an appropriate length and the same with the stops, using one of my stock of manufactured findings as a guide...15mm for the length of the stem and 18/19mm for the length of the Stop.

I filed the ends of the Stems flat and smooth.

I filed the ends of the Stops smooth and flush, rounding off the edges and corners with my favorite emery-nail board to give them a good finish.

I soldered the Stem onto the Stop with hard solder. Notice that I have lifted up the stem by propping it on two overlapping saw blades, which serves to raise the Stem up into the centre of the Stop.

Here are the finished swivel backs, ready to go on to their decorative counterparts. I laid them on my steel block so the Stems were flat on the surface (with the Stops over the edge out of the way), then used my planishing hammer to flatten off the stems from round to square, whilst leaving the loop still with rounded profile. This gives a nice 'sturdy' look and complements the square profile of the Stop,  also strengthening the Stem further. Pickled and brass brushed.

The last thing to do is attach the swivel backs to the decorative counterparts by threading them on to loops soldered onto the decorative backs, which are still unfinished. Notice the single hole in the backs which I have drilled to be the same diameter as the loop wire. The loop wire is 1.5mm and the loops, or rather 'n's have one leg slightly longer than the other, so that the longer leg can sit in the drilled hole and make soldering them onto the backs much easier....I don't even have to hold them in place with tweezers. I placed them on a wire mesh and soldered the loops on with hard solder by directing my flame on the other side, with just a quick dart of heat to the front at the point of liquidus (when the solder flashes into it's melted flowing form), thus avoiding annealing the swivel elements. If due to the design I couldn't drill a hole through the piece, then I would instead have used a cotter pin to hold the loops upright.

Quick and easy. If the cufflinks had consisted of two decorative elements instead of one and a Stop, then I would use the same concept, but at both ends having the Stem made up with a loop at both ends, so that it looks a bit like a cartoon of a dog bone.

Thursday, June 23, 2011

Charm Swap 8 - week 12

12 weeks in and we have some wonderful progress to report from some of our charm swappers!

Betsy from BetsyBensen sent in this photo of her works in progress with one of her finished charms and says that what she's learned from this process is that she's not really a fan of production work and enjoys making her charms one at a time ....I think that it's really great that some people are using this charm swap as a learning experience and I also think Betsy's finished product looks awesome no matter how she goes about putting them together!


Erin from ErinAustin also sent in some photos this week of her progress. She says "I cut the form folded strips into cabs and gave some of them a nice red patina! fun! fun!" It seems like Erin is really enjoying working on her charms. I can't wait to see her finished product!


We also have word that Jen from JenLawlerDesigns is thinking about doing some mini house charms with a textured copper back similar to some pendants she is making. She hasn't sent any photos as of yet so she is keeping us in suspense...Until next time! ~ Michele from MicheleGradyDesigns

Wednesday, June 22, 2011

Book Club Challenge: "Hyperion" by Dan Simmons

The Hyperion Cantos might be my all time favorite Science Fiction Series, so it was an obvious first choice to suggest to the EM book club. I couldn't help myself and ended up reading all four books in the series before committing to a piece.

Often referred to as a Space Opera, the first book in the series, Hyperion, employs the literary device of the frame story, a secondary story within the story used to provide a framework for connecting a series of unrelated stories. At the start of Hyperion we are presented with 7 individuals setting out on a pilgrimage to confront the Shrike, a lethal enigma moving through time, thought by some to be a myth. The story unfolds as each pilgrim divulges their previous encounters with the creature, the planet on which it resides, or The Shrike Church, as well as their intentions for this assumed final meeting. Simmons successfully creates a reality ripe with political, social, and religious ideologies and dynamic characters. Although it may take the reader a while to emerge themselves in this foreign reality, as Simmons often leaves much to the imagination, the effort expended in visualizing the setting is well worth it.


Beth Cyr

Simmons is an excellent writer and I found very easy to read. It was a little rough at first. Many of the 'other worldly' aspects were given names, but not really described. To start with, it seemed a bit confusing, but very quickly I found myself just accepting these new words or objects and using my own imagination to create the mental landscapes. What better to create a jewelry piece than an author who encourages the reader to use their own imagination so strongly?
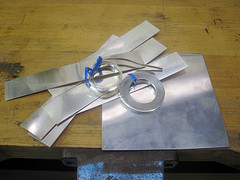
Shrike Ring
Shrike Ring


  The Shrike is a legendary "being". From Dan Simmons's description, my own imagination and discussion with the EtsyMetal gals - the idea for my piece was developed. The Shrike is a dangerous and vicious creature - maybe somewhat humanoid - or giant armadillo/sea urchin made out of metal. An entirely metallic being with armored plates and spikes and blades, but still organic in nature. It is mostly a character of legend, not making a direct appearance in the book. And I found it to be wonderfully inspiring - and created the Shrike Ring! Maybe a ring one of it's followers would wear... since I doubt it has anything resembling a finger or any need for a ring...

Erin Austin 

Hyperion is filled with mystery from the Prologue all the way through, and for me one of the most intriguing parts was the juxtaposition of Christianity and the Church of Final Atonement (the Shrike Church). Both are fringe religions at the start of Hyperion and both are presented as equally preposterous, the first being outdated product of an antiquated society and the second focused around "The Lord of Pain", better known as the Shrike, and viewed by the general population as a barbarous cult that sends it's pilgrims to certain doom.


Shrike Brooch: Sterling Silver, Copper, Garnet
 When a character named  Sol Weintrob takes his child, who suffers from an illness that has her aging backward, to the priests of the Church of Final Atonement and asks for guidance in having her be "made well" the bishop states that Sol is speaking of physical well being and that "[The Church of Final Atonement] is the final arbiter of spiritual salvation".

Shrike Brooch: Sterling Silver, Copper, Garnet


What is the Shrike? Should we fear it or revere it? Either way, I hope my piece, meant to be a religious artifact to adorn the robes of the priests from the Church of Final Atonement, does the Shrike a bit of justice.


Victoria Takahashi 

When beginning this book it was a slow start for me, the new solar systems, lands, tools, cultures etc took awhile for me to digest, eventually I just had to not think about it too much and just read so I was not losing my train of imagery (thought) so much. When I finally gave in and just let it flow I was captivated by the seven main character stories merging into one new tale. 

I think my favorite part was the Priest's Story of the strange Bikura peoples and their mysterious rituals. And then there is sad King Billy I think he would of been fun to hang out with! Oh and then there is Rachel's story of course. Which leads me into deciding on getting the sequel "The Fall of Hyperion". I have been going back and forth about reading the next one. I want to know what happened kinda badly because Hyperion completely left me hanging! So I know I will read the whole series I am just not wanting to give into his wicked ways of writing. So in a nutshell, if you read Hyperion, be prepared to just get the whole set so you don't have to stop. 


Shrike Totem: sterling silver, naturally shed deer antler, buckskin
Victoria's Shrike Totem was inspired by the following passages:

"Sol, you must take your daughter, your daughter Rachel whom you love, and offer her there as a burnt offering, Sol you must listen well...."

"...Rachel woke suddenly gasping for air. what was that dream? She grabbed for her totem around her neck, a piece that was still in her tiny hand when they found her, so it was made into a totem for her when she was just a newborn her father told her, to always be worn to keep her safe.
The dream was a feeling of being held high above in the warm desert wind with the soft coolness of steel on her skin. Then the sudden violent ripping of the ground beneath her falling away into nothingness,
she reaches out to hold on to anything solid as her safety disintegrates from around her....
This is why she has this totem she is told. It's what kept her here in this time shift, alive to grow into her second adult life, how much was a dream?"

Coming up next: "The Strange Case of Dr. Jekyl and Mr. Hyde" by Robert Louis Stevenson

Tuesday, June 21, 2011

It's Summer Time!

Summer means lounging at the pool, catching up on that reading list, and spending time in the sun or around the bonfire with family and friends. Since today officially marks the first day of summer in the Northern Hemisphere, we thought it would be fun to share some of our favorite summer time jewelry and summer time treats.

*******************************************************

Double Cicada Lines Necklace

Sudlow


"Summer around Kansas means the cicadas start coming out and I start making key lime pie!"

Key Lime Pie Recipe

1 can sweetened condensed milk
1 ( oz.) pkg. cream cheese, softened
1/2 c. Key lime juice (regular lime juice works fine too)
1 tsp. vanilla
1 grated lime rind (grate BEFORE you juice them)
1 (9 inch) graham cracker crust (pre baked & cooled)

Blend milk, cream cheese, lime juice, and rind in blender, add vanilla, blend again. Pour into 9 inch graham cracker crust and chill for four hours. Sprinkle with extra lime rind for color.


******************************************************* 
Rest is not idleness, and to lie sometimes on the grass on a summer day listening to the murmur of water, or watching the clouds float across the sky, is hardly a waste of time.  ~John Lubbock 

*******************************************************


Mini Segmented Saucer Earrings

"Summer to me is cold, clear swimming holes, big beautiful Texas skies and enjoying zinnias from my garden."


*******************************************************  
Summer is the time when one sheds one's tensions with one's clothes, and the right kind of day is jeweled balm for the battered spirit.  A few of those days and you can become drunk with the belief that all's right with the world.  ~Ada Louise Huxtable

*******************************************************
 
Nina Dinoff

Swinging Double Leaf Mod Earrings

"As for summer I love 80 degree weather and now that you mention it, mojitos!" 

Mojito Recipe 
  • Ice
  • 6 ounces light rum
  • 12 mint sprigs, or spearmint, 8 roughly broken apart
  • 6 tablespoons fresh lime juice
  • 4 tablespoons sugar
  • Club soda
  • 4 slices lime

Directions

Place ice in beverage shaker then add in the rum, 8 broken up mint sprigs, lime juice and sugar. Shake well and serve over ice in a high ball glass. Top off each glass with a splash of club soda.
Garnish each with a slice of lime and a sprig of mint.

 *******************************************************
 Deep summer is when laziness finds respectability.  ~Sam Keen

 *******************************************************


Miniature Flip Flop Dangle Earrings

  "I look forward to swimming everyday in my pool and tending to my garden- that's summer for me!" 


 *******************************************************
Colored scents that fill the air as drowsy insects hum around in the meadow
is the place of secret magic where nature alone renews itself.
-- Kate Bergquist
 *******************************************************


Dragonfly Necklace
"My favorite summer treat is back yard BBQ's with friends!"

 *******************************************************
Nothing is more memorable than a smell. One scent can be unexpected, momentary and fleeting, yet conjure up a childhood summer beside a lake in the mountains. - Diane Ackerman

 *******************************************************


Thin Textured Rectangles    
"Summer means nights around the fire pit toasting marshmallows!"


S'more Variations:
  • Instead of chocolate use peanut butter cups
  • Add junior mints or caramels
  • Add sliced strawberries or bananas
  • Try adding toasted almonds for some crunch
  • Switch out milk chocolate for white, dark, or mint
  • Bacon anyone?


*******************************************************

What's your favorite summer past time?

Sunday, June 19, 2011

Happy Father's Day!

Bill Dennard, Connie and Karl Akers
My parents (on the right) with friend Bill Dennard at an art show in Houston in about 1973.

My dad, Karl Akers, is the best. He has been endlessly supportive of my artistic endeavors for as long as I can remember. He was the first person to show me how to solder when I was in high school, and I knew that jewelry making was something that I wanted to learn from that point. It was several more years before I was able to take a metalsmithing class my sophomore year in college. When I took that class my parents gave me a tool box with a jewelers saw and some other tools that they had used in college. Dad had worked in the Arts and Crafts Studio at the University of Houston while he attended school there. Both of my parents used that studio to make some jewelry in those days. Though neither of them pursued jewelry making beyond those years, both are crafts people, dad a woodworker and mom a fiber artist. I grew up in a make it yourself household, surrounded by handmade objects, and art has always been a part of my life. Dad also gave me a jewelry design book that was an early influence on my aesthetic and interest in the field, Contemporary Jewelry A Studio Handbook. This book belonged to my dad, the original inscription reads, "To Karl, with Love. Happy Anniversary 1972. Connie", a gift from my mom to my dad. Below that reads, "To Ashley, My own Jeweler. Love Dad, Christmas 1995". Dad built my workbench, made my hydraulic press, has made display cases and earring stands, tent weights and many other necessities for an art booth. He has helped me to set up for shows and hung out at shows. I am one lucky girl, and these are just the jewelry related things that dad does for me. More recently he made Frank and I a bench with our names sandblasted in the side and built a fence in our backyard in the 100 degree heat. Like I said, my dad is the best. He even wears my jewelry. He has several bracelets that I have made, and has worn them all over the years. Unfortunately I don't have pictures of those. His favorite bracelet was lost last year, it was a simple woven sterling chain. I plan to make him another of those for his Father's Day gift.

Dad, Mom and I in May 1978.
May 1978

The bench and new fence that dad built us.
The bench and new fence

Happy Father's Day to all you fathers out there! I hope you have a wonderful day with your family and friends enjoying a celebration of fatherhood.

Sunday, June 5, 2011

EtsyMetal Blog Carnival 6.6.11: Studio Tour

May's Blog Carnival is here!
The topic is:


Etsy metal Studio Tour
Show us where you work!

Be sure to read everyone's posts ~ You will see where some fabulous pieces are created!

Shirlee Grund
Beth Cyr
Elizabeth Scott
Cynthia Del Giudice
Michele Grady
Erin Austin
Nodeform
Evelyn Markasky
Kathryn Cole
2Roses
Lauren Anabela Beaudoin/Creative Dexterity
Rebecca Bogan

Goin' on a Picnic

It's a beautiful day here at Hartleystudio! Weather's fine, not a cloud in the sky. I think I'll pack up a picnic and head out to our favorite spot. Today's finds are all things I wish I could take along with me.


Thanks so much for looking!! Have a great day...see you next week!

Friday, June 3, 2011

MEMBERS' NEWS FOR THE MONTH OF JUNE

Hello and just in case you were wondering where the Etsy Metal team members are this month, well, I'm reporting. Here's the scoop-
Heather and Kerry Alice of TwigsandHeather and Kate Jones of KateJonesJewelry will both be in Boston June 4th at the Coolidge Corner Art Festival.

Shirlee of LindenandLychee and Michele Grady of MicheleGradyDesigns will both be in the new Lark book 30 Minute Bracelets.

Corliss and John of 2Roses will be in the upcoming Humor in Craft book, published by Schiffer and edited by Brigitte Martin of Crafthaus. They have also launched a metal arts lecture program for the Orange County Unified School District.

Ashley of AshelyJewelry has 4 pieces in a show called The Softer Side of Art. It features Ashley's fiber jewelry. She was also interviewed by a local Texas magazine
called 360 West. Her story will be in the July issue which will be on news stands soon.

Well, until next month! Hope to see you around,
Sue Szabo

Thursday, June 2, 2011

Charm Swap 8- week 9

In last week's post I posted about Marcus Marguillier of The Pearl Forest. He sent a sketch of his prototype as well as some images of his work in progress. Today I have a few more photos from him of his prototype in the works as well as the finished piece. I think it looks great!


Since this past weekend was a holiday weekend due to Memorial Day here in the US, I know a lot of us didn't have much time to work on our charms. Hopefully next week I will have some of the others work in progress to post about as well. Until then! ~ Michele Grady
Related Posts Widget for Blogs by LinkWithin
 
>