Wednesday, February 29, 2012

Members' News for March

I bet you've been wondering what the Etsy Metal team has on tap for March and I'm here to tell you-

Maria Whetman of Fluxplay has been selected to show in the prestigious Association of Contemporary Jewellers Diamond Jubilee Exhibition. Announcement and catalogue will shortly follow on Crafthaus. The exhibition tours the length of England and was curated by ACJ and Professor Jack Cunningham, so the tour starts in Birmingham at the School of Jewellery then visits the new Goldsmiths Centre in London established  then the tour ends in Scotland.


I have made a cluster of 3 "celebration hatpins for the Queens hat". One is a 'diamond' made from a Gordons Gin & Tonic can, set in a traditional stone setting with a subset faux diamond, the second is an icy clear resin, 'melting' ice cube containing a square faux diamond and all set in a traditional-inspired stone setting, the third pin is a repousse slice of lemon containing a pip-shaped (marquise) faux diamond. I have published a blogpost including a couple of photos of work in progress early on, click here to see them- http://fluxplay.blogspot.com/2012/03/gin-tonic-with-ice-and-slice.html
```````````````````````````````````````````````````````````````````````````````````````````````````````````````````````````````````````

March 12-17 Birmingham School of Jewellery.
June 11-17 (during London Jewellery week) Goldsmiths Centre, London.
July 2-28 SH Gallery, Morningside Rd, Edinburgh.
August 27-31 North Glasgow College,Glasgow.

Congrats to Maria on this fabulous accomplishment!


Shirlee Grund from Lichen + Lychee Jewelry is now available at Venue in Ballard.

L. Sue Szabo from lsueszabo (that's me folks) has 3 bits of news for this month-

I was accepted into Crafts National, a national multi-media show at the Mulvane Art Museum in Topeka KS. The show runs from May 5- Aug 19, 2012.

My enamel work will now be carried in the gift shop of the National Ornamental Metals Museum in Memphis TN.

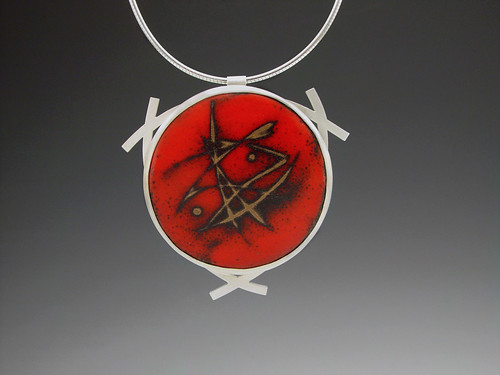
My work was also recently accepted into the Women's Works show in Woodstock, IL. This is a national juried show of all media and runs March 3- May 1, 2012. Here is the website and the show will be up there after it opens- http://womensworks.squarespace.com/. Here's the accepted entry-

Sticks and Stones

Sticks and Stones.- back detail


Finally, Meg Auth of SimplyMega will be exhibiting a peice entitled "Moveable Feast" in the
Mercury Bay Art Escape
Taste of the Tour
Showcase Exhibition
March 9 through April 10
At Hot Waves Cafe in Hot Water Beach on the Coromandel in New Zealand.
for further information: http://www.mercurybayartescape.com/

Well, I'll be back next month with more news on the Etsy Metal team. You never know where we'll turn up next.

Sue

Tuesday, February 28, 2012

Ask Auntie EM - Pinning

Well, it's Tuesday and we are back again answering your questions in EtsyMetal's weekly blog post called "Ask Auntie EM". If you're new here, this is a weekly blog post written by Sue and Ann where we tackle your metalsmithing and non metalsmithing questions. Having trouble with your solder? Need some help with stone setting? Have a problem 2 year old? We and EtsyMetal's 100+ members probably have the answer. If you'd like YOUR question answered in the future, please email your questions to askauntie@etsymetal.com and we will get to it as soon as we can. If you'd like to read past posts, they can be found here.

This week's question is one we get a lot. It's about "pinning" and it comes from a beginning metalsmith:

I've wondered this forever, how do you attach small drilled beads to a silver sheet, I have seen many with 2 little balls on each end and I have tried to solder them, trying to protect the little bead but they always break, how can I do this?

Pinning is a great technique. It can be used in many ways and I'd consider it a cold connection because it doesn't require solder. You do need the right kind of torch though, but we will talk about that in a minute. These earrings use pinning to connect the three sections together.
Pinning works because, when heated, sterling silver, argentium silver and fine silver as well as karat golds will form a ball when melted. Creating a ball on the end of a piece of wire works well up to about 18g, after that the wire is just too thick and the molten ball will be too heavy to create a nice shape.

The first step in pinning is to drill a hole through the object you want to pin. The hole needs to be slightly bigger than the wire you are going to ball up. You want the wire to go through the hole easily but you don't want it sloppy in there. If the hole is too big, the ball on the end of the wire will pull through.

The next step is to ball one end of the wire before you assemble your piece. To do this, you will need a really tiny and really hot flame, most likely you will need compressed oxygen to pin. I use a smith little torch when I pin anything. It makes a super hot, super small flame. To ball the wire, aim the flame where you want the ball to be, not at the end of the wire. As the wire melts, it will draw itself up into a ball at the level of your flame.

So, now you have a piece of wire with a ball at one end. You need to remember at this point that, sometimes, once all the pieces you are pinning are assembled and the pin in completed the piece cannot be pickled. If you pin organic items, pearls, or some gemstones they will not be able to go in the pickle so everything needs to be completely finished before you pin. Now that you have made a ball on one end of the wire, assemble all your pieces and clip your wire, leaving a tail hanging out. This is the tricky part and sometimes trial and error is the only way to succeed. Once you have completed several pins you will get a feel for how long your extension needs to be. Once your piece is assembled you will make another ball at the end, aiming your small, hot flame as close to the base of your piece as you can. When the ball gets as close as you want it, pull your flame away quickly and you're done!

Pinning is easy once you get the hang of it. It takes lots of practice and I'd suggest doing a lot of pins before trying to pin something delicate, like a pearl or a gemstone bead. The only real requirement is a very tiny and very hot flame and a lot of patience.

Thanks for checking in this week! Remember, email your questions to askauntie@etsymetal.com and we will get to an answer as soon as we can!

Monday, February 27, 2012

Featured Member: E² ~ Ester Eve

E²
 Esther Eve Metalsmith


Tell us a bit about yourself
I had an obsession with seed beads and Indian loom-woven jewelry when I was a young girl, so I guess you could say that I've had the 'bug' for jewelry most of my life. In late 2007 I began my love-affair with metalworking, and the rest is history. I intend for my work to have a very armor-like and ancient whimsy, as I am obsessed with medieval and old-world style and culture. I intentionally antique and distress each piece for a timeless rustic feel, and use sterling silver, copper, brass and natural stones for my typical medium. Aside from using traditional silversmith techniques, I love to create organic designs incorporating crafts such as etching, electroforming, enameling, and various patina concepts. Each piece is entirely hand-made in my small home-based studio, currently residing on the Emerald Coast of Florida.

Describe your work in one sentence
Organic and rustic bold statement pieces from silver, copper and brass, incorporating natural stones, and antiqued for an old-world feel.


What are your favorite materials to work with?
I always thought that my heart was with silver, but the more I work with alternative metals like brass and copper, the more that I appreciate the organic and earthy nature, as well as the malleability the metal has underneath my fingers.  Also, with the rising cost of silver over the past few years, it helps to work with more affordable materials, to help keep the cost down for my customers.  Found antlers, animal teeth, feathers, shells, and other such organic found objects fill me with such joy...I am working through ways to incorporate them into my work.


What direction do you see your work going?
Aside from using traditional silversmith techniques, I love to create organic designs incorporating crafts such as etching, electroforming, enameling, and various patina concepts. I don't see myself straying from the passion I have for organic work, but hope to continue to strengthen my technique and skill set so that I will have more freedom to really create what I see in my head.  


What is the best advice you've ever been given?
My father taught me that honesty is the key to a peaceful heart, and a happy life.  This has proven incredibly true, and I treasure this invaluable training that he gave me when I was young.

If you could add one tool to your collection what would it be? 
A rolling mill at the top of my wishlist, I know that I could create some really interesting patterns to add to my work.  

What do you listen to in the studio?
Discovering new music is a great passion of mine.  I'm a child of the 90's era music, so much of what I love was created in that decade, but I love earlier and some recent music just as well.  Usually in the studio I tend to listen to more mellow and soulful artists, but I love my heavy metal just the same ;o)
I'll just list a few here that I've recently added to my playlist:
Adele, Arcade Fire, Cowboy Junkies, Dangermouse (the new album with Jack White and Norah Jones), Das Racist, Deftones (always a huge fan!), Florence & The Machine, Mazzy Starr, Johnny Cash, Lissie, Lykke Li, Metallica, Minnie Driver, Morcheeba, Mumford & Sons, Neko Case, Nina Simone, Portishead, Shakira (I'm terrible at booty-shakin, but sometimes need to spice things up in the studio and get a little crazy!), Smashing Pumpkins, The Ravenonettes, Thievery Corporation, Zach Brown Band, Zola Jesus.


What is your most prized possession? 
My mothers tiny gold mirror, that is engraved with her name and fits perfectly in those little pockets inside most purses.  I'm so scared I'll lose it, so I never actually put it in my purse...it usually stays in my jewelry box where I can still see it daily.  She passed when I was 14, and I will always treasure the memory when I would admire the mirror when I was a child and she would let me play in her purse.

Do you collect anything? If so, do you display your collections? 
I adore old and rusty tins, small carved wooden boxes from around the world, and tiny cigar boxes....I have them stashed all over the house and keep jewelry, stones, matches, etc in them. There are plenty of Etsy Vintage sellers that I frequent to eye their wares!


How do you spend most of your free time? 
I have recently re-located to a beach very close to Destin, FL, and so any free time is spent mostly wandering around the gorgeous emerald beaches.  This particular part of the gulf coast is known for washing in some of the most beautiful shells!  Other than that, my hubby and I are big movie buffs, particularly action, sci-fi, post apocalyptic, I love to tend to my small plant garden on my apartment balcony, read a good book when I have a chance, and cook wholesome and flavorful meals.

Where can we see your work? (shops, blogs, upcoming events, installations, etc)
You can find my work in my Etsy Shop, My blog, and my Flickr.  
Friday, February 24, 2012

“What’s New”

Saturday is here again and I have the pleasure to show you our new creations for this week listed in our Etsy shops.
Visit our shops and show us your love !

betsybensen                                           Rebecca Bogan
12
aroluna                                                     Jen Lawler Designs
34
 e5jewelry                                                 Michele Grady Designs
56
 Juju By Sarah                                          nova designs
78 
Amuckdesign                                           Erin Austin
910 
LivelyHood                                              Silentgoddess
1112 
lsueszabo                                                  ThePearlForest
1314 
SCJJewelryDesign                                 kate jones jewelry
1516

I'll be here nest Saturday for more jewelry from our team.
Have a great weekend !
Inbar

Thursday, February 23, 2012

Charm Swap 9 Update

I am back this week to bring you a bunch of great charm swap progress photos from several of our participants.

So without further ado!


Erin of erinaustin shows her charm progress from soldering to initial design layout:


You can read more about Erin's charm progress on her blog: Metal Musing


Tess from novadesigns shared these progress photos of her seahorse charms:

"I soldered all their little bodies together but they're missing fens and obviously the color so right now they look like little naked seahorses."


And Shae from citizenobjects is DONE!

I loved what she had to say about her charms:
"I think these were the most tedious things I have ever fabricated. But satisfying."


And my last update comes from Sarah of JujuBySarah.

Here is what she says about her charm progress:
"OK, I'm half way done! Twelve finished and ten to go. We had the photo stuff up yesterday, so I took some teaser shots."


Until next time...

Tuesday, February 21, 2012

Ask Auntie EM

Well, it's Tuesday and we are back again answering your questions in EtsyMetal's weekly blog post called "Ask Auntie EM". If you're new here, this is a weekly blog post written by Sue and Ann where we tackle your metalsmithing and non metalsmithing questions. Having trouble with your solder? Need some help with stone setting? Have a problem 2 year old? We and EtsyMetal's 100+ members probably have the answer. If you'd like YOUR question answered in the future, please email your questions to askauntie@etsymetal.com and we will get to it as soon as we can. If you'd like to read past posts, they can be found here.

This week's question is one I get asked a lot and involves soldering and enamel. Here's the question from hollymolecule-
I've been enameling for a while but just recently learned some soldering skills- so which comes first, the solder or the enamel? I know there's more than one way to skin this cat, but I'm interested to see what you all have to say.

I'm going to try to tackle this question but realize that this question alone could take an entire enameling course to really do it justice. There are many ways to do this but I'll try to explain mine without writing a book.

First you need to understand different types of solder that are used in enameling.
The first is IT solder- IT stands for Intense Temperature so that is an easy way to remember that it flows at the highest temperature of all the solders.

The second is Eutectic solder- it flows at the second highest temperature and is notable for the fact that it contains NO ZINC. It is composed purely of fine silver and copper. I will explain the significance of this later.

Finally, enamelists also use the regular solders that metalsmiths do- hard, medium, and easy. There is a product called TIX solder which is super low temp solder that I have seen some enamelists use. It can be flowed with very little heat. It is used after all the enameling is done and you need to solder a pin back to the piece, for example. I do not recommend this at all. It is not a strong bond and the color match is pretty bad. This is an example of bad craftsmanship, in my opinion, and is used by enamelists who don't want to bother with real soldering skills. I would never use it but it's out there and I want to make you aware of it. Now, forget I ever mentioned the stuff....

Before we get started with soldering, I would like to post this simple solder chart that shows the temps at which the various solders flow. You will want to keep this in mind when you decide to solder your enameled pieces.

IT 1490F
Eutectic 1460F
Hard 1425F
Medium 1390F
Easy 1325F

Note that most medium fusing enamels flow at around 1400F- right around the flow temp of hard and medium solder. If you are one of those enamelists who like to fire your enamels hot (around 1500F or higher), you can see that there is no solder that will not re-flow at that temperature. This is important to know- if you have a 3D piece that has been soldered and then enameled, and you fire it too high or just a little too long, the solder will re-flow and the piece will fall apart in the kiln!

So, how do we use all this information? Well, if you are just learning to solder with your enamels I would suggest you start with easy 2D/flat projects. Save the 3D forms for when you become more experienced.
I solder before enameling almost all the time. If I have a complex 3D form that has a high risk of falling apart in the kiln, I would want to use the highest temp solder- IT- and fire the piece lower, especially for the first couple firings. Remember that all firings but the last can be under-fired will no ill effect on the final enamel finish. With each subsequent firing, the solder gets a little "harder". We see this in metalsmithing as well. As the zinc burns out with each heating (either by kiln or by torch), the flow temp of the solder goes up. So, many low firings in the kiln actually will raise the flow temp of the IT solder even higher. This works to your advantage. The only downside to this is that you really should not put enamel over the solder seam so it needs to be used selectively.

Solders that contain zinc (this is all BUT eutectic) will not give good results if you enamel over the solder seam. Zinc acts as a contaminant to enamel and will cause discoloration, pitting, or even pinging off of the enamel. If you need to put enamel over the solder seam, then you must use eutectic. There is no other choice.
If I wanted to do a complex 3D form (or a 2D form) and enamel over the seams, I would use eutectic and be mindful not to overheat the piece in the kiln cause this solder flows at a lower temp than IT. Make sense?

Many enamelists use regular hard solder for 2D pieces that will go in the kiln. This is usually fine and often the solder will re-flow when the enamel flows. They are just too close to the same flow temp for that not to happen. That's OK as long as the solder seam isn't too close to the enamel- you wouldn't want the solder to flow into the enameled area and contaminate it. I would not use hard solder for 3D forms because when it reflows the piece will fall apart.

You can exploit the flow properties of hard solder by also using it AFTER enameling. When you solder with hard, the enamel will reflow and as long as it goes to full maturity, it should look as good as when it came out of the kiln. Just be sure to support it properly because you don't want weird marks on the glass. People who solder after enameling sometimes use enameling trivets and the like to solder on. I personally don't like this approach, but that is just my preference.

Medium and easy solders really don't work well in enamels. They flow too low to hold up in the kiln and if you use them after enameling, they will flow before the enamel goes to maturity. This will leave you with a soldered joint and an underfired enamel. If that's the look you want, then by all means, use this to your advantage. It will be difficult to get a fully matured enamel with these solders.

Remember that you have 2 choices for enameling over silver. One is to use fine silver and the other is to use sterling silver that you have depletion gilded (perhaps another talk for another day). Do not use regular sterling silver that you have not gilded. When you fire enamel over sterling, you will develop fire scale except with the enamel over it, there will be no way to remove it. You will see it forever. Fine silver or gilded sterling will not develop scale like this so the surface stays clean.

As an aside, if you have a way to laser weld silver, by all means, use it. If you do this you will not have to worry about solder at all and you can enamel right over a welded seam. I have a friend who makes these unbelievably complex vessels with enamels and this is how she does it. I couldn't figure out how she had so many solder seams and have them hold up in the kiln-on a vertical vessel, no less. She confessed to me that she bought a welder and there is no solder. Brilliant!

A similar idea is to fuse your metals. While fusing can still fall apart in the kiln, you do not need to worry about putting enamel over a zinc-containing solder seam. This is a wonderful way to eliminate the solder problem all together.

Well, this is just touching on the basics but is a good start. The best teacher is experience and I encourage you to play around with test enamels before you try this on one of your real pieces.
IT and Eutectic solders should be in every enamelists' basic kit- you can get them at most major enamel suppliers.
Now get out there and take your enameling to the next level and have some fun! Til next week, happy metalsmithing.

Sue


Saturday, February 18, 2012

“What’s New?”

Good Saturday everyone !
A rainy week and gray days in Israel.
I love the sun, warm weather and bright light, and here I an back again to show you what make me feel much better !

                 kerin rose                                                betsy bensen
12
                 Rebecca Bogan                             Michele Grady Designs
34
               ThePearlForest                                   lsueszabo
56
               Juju By Sarah                                       Hartleystudio
78
                     aroluna                                                     2Roses
910
                 Erin Austin                                            simplymega
11il_570xN.312889093
I will be here with new collection next Saturday.
Have a wonderful weekend my friends !
Inbar

Thursday, February 16, 2012

Charm Swap 9 Update

Lots of new updates this week!

I finally bit the bullet and sat down early this week and started my charms. I found I was so caught up in figuring out a perfect design in my head that I wasn't actually coming up with anything. Creative block was certainly setting in. I decided just to pull up my chair to my bench and start playing around with some standard design shapes and this is what I came up with:


Due to the sky rocketing cost of sterling silver, I opted to do the majority of my charms in copper but I did sneak in some sterling casting grain to the design. I also wanted to add a splash of color to my charms with some torch fired enamels. Here is my finished charm prototype:


Back of charm:


I am quite happy with my final results. One down. Twenty one to go!


Laura from SimplyAdorning shared her charm design progress.

She says, " I have my concept figured out, it will probably end up being a round charm, but here's the idea of it. I took a Zentangle drawing class and it was both fun and inspiring, so I wanted to try and translate it to metal...it will be mixed metal, with riveting."


Shae from citizenobjects has been busy working on her charms too.

She shares this about her charms: "I finally have gotten underway. I thought I had it all figured out months ago, and then of course at the last minute I had an epiphany! Here are WIP photos and a prototype- don't worry, the real charms will be much nicer (I hope). The engineering of this took me a while- I am sure you sneaky jewelers could have done it in your sleep."


Until next time...
Related Posts Widget for Blogs by LinkWithin
 
>