
![[Most Recent Quotes from www.kitco.com]](http://www.kitconet.com/images/quotes_special.gif)


This is a contemporary setting which nicely complements the shape of the stone. Here, I have made the setting into a ring. Notice that my stone changes halfway through the tutorial, this is because there was a few weeks gap in time between when I started and finished the project...where I managed to misplace the original stone in the interim! As with all my tutorials, this is the way that I myself make this setting, there are many variations and tricks used by different jewellers to make settings, there really isn't a definitive 'right' and 'wrong' way, there will be other ways of making this setting. Set the stone as you would normally by using a pusher first, then finishing off with a burnisher.

In your doming block, make a dome which allows about 1mm extra space at either end of your stone. In this example, my metal is 0.9mm thick to allow for depth of metal to be cut away in creating the seat later.

Use a template or some other method to mark your dome in half.

I use a piece of emery paper to draw a line that dissects the dome.

Saw the dome in half, then use binding wire to re-assemble the pieces back together, into the cup shape. Flux and solder together.

Check the stone fits into the cup. I'm using a nub of beeswax to hold onto my stone. I needed to open up my cup a bit as it was too narrow, I did this my forcing a doming punch into the cup until the stone fitted in nicely. File / emery (also know as Wet & Dry paper) the rim of the cup until it is level.

Now, as for a normal cabochon rub-over setting, envisage where the base of the stone needs to sit so that there is enough height of metal to rub over the curved sides of the stone. You can see here where I have chosen where that seat needs to be and I am using dividers to score a line.
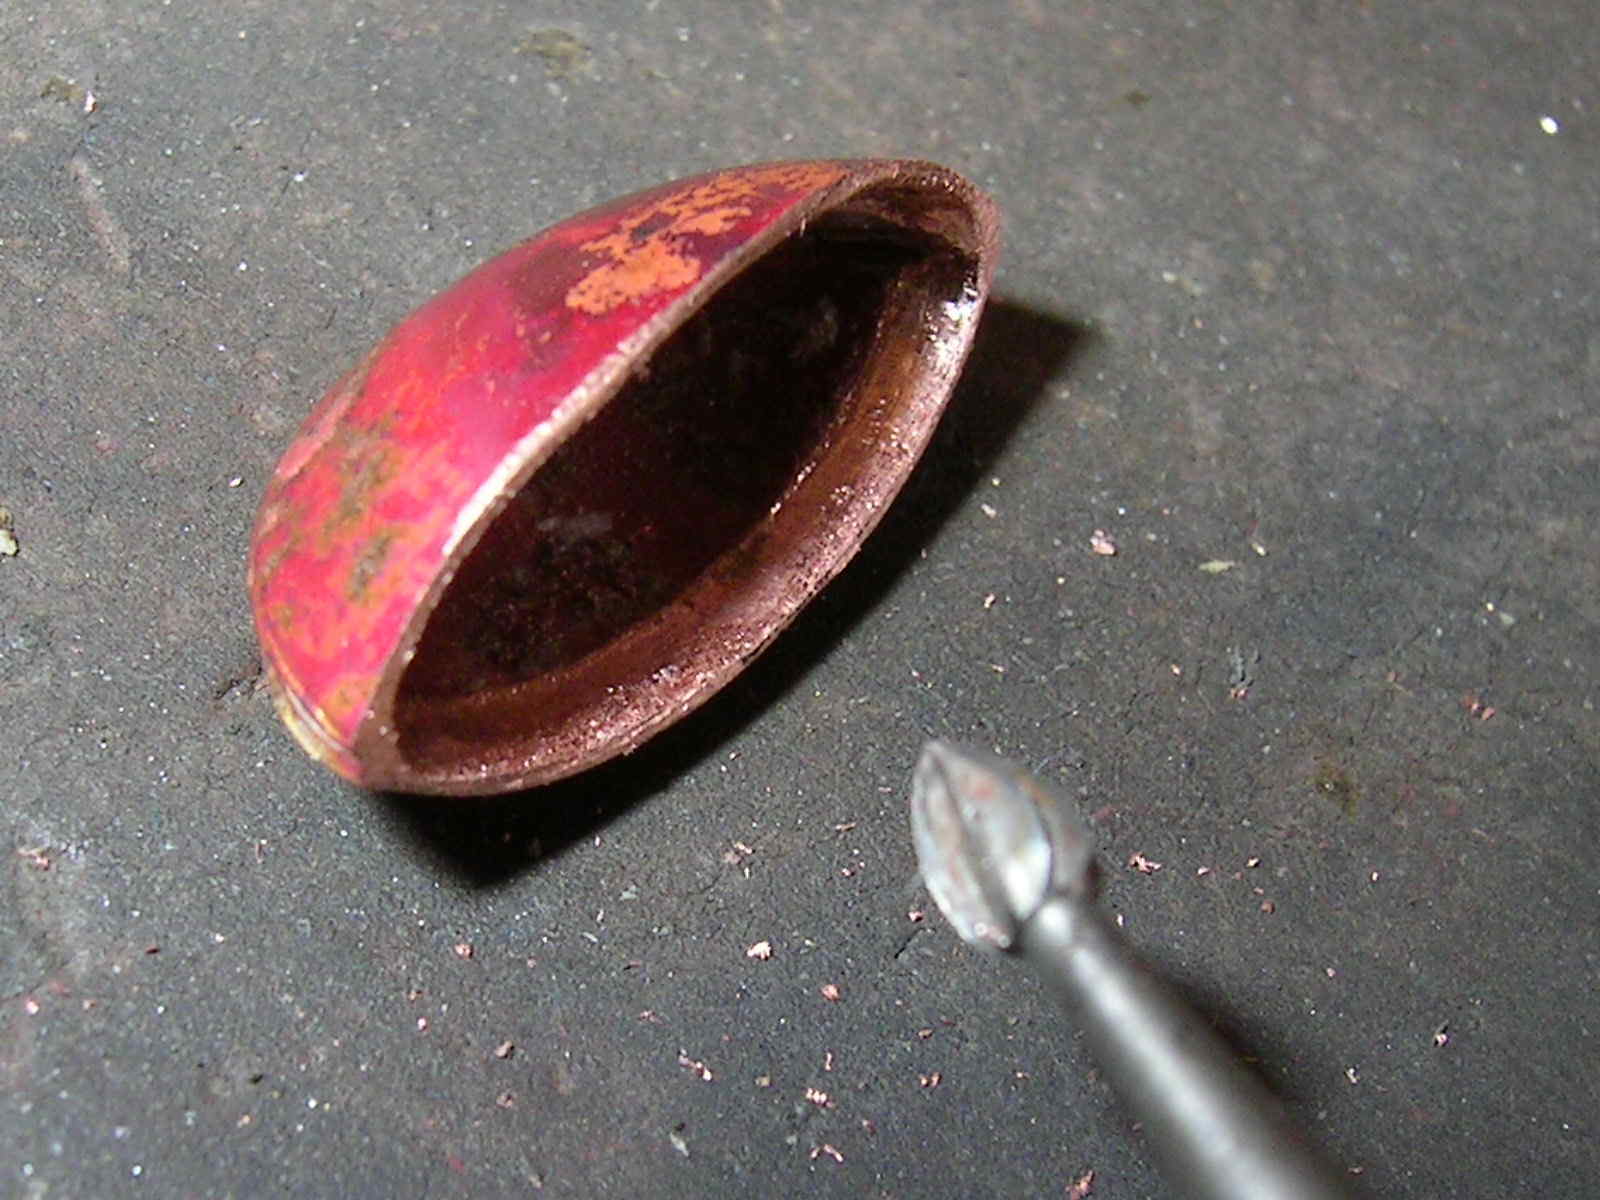
Next, you need to cut away the metal of the seat, down to the line you marked earlier, to create the seat. Try and keep to within the line you cut. I find this part tricky as I'm not too handy with a pendant drill, the burr which I find easiest to cut the seat out with is one of these shown above, a "bud burr" but you might mind a different burr easier, just experiment. Keep your metal dust for sending off for recycling.

Next, use a graver to sharpen up the burr-engraved seat, making the little ledge that now exists, crisp and sharp. Keep testing the fit of the stone into your work.

Here you can see the finished cutting inside the cup, with the (upside down) stone next to it.

Here you can see the stone sitting inside the cup mount ready to be set. Notice that the walls of the cup are significantly thinner after being burred away. For teaching purposes I am leaving this ring un-set to allow students to see the interior of the cup and the burred seat. To set the stone I would use a pusher then finally a burnisher to set the stone, just as you would for a basic rub-over cabochon setting. If your marquise stone has quite sharp pointed ends, then for a neater shape, you could file down the pointed ends of the almond shaped cup, so that they are a little lower than the rest of the bezel edge, then this would eliminate any pinching. I didn't need to do that here, because my stone has quite rounded tips.

This book is one I have bought very recently and find to be superbly clear to follow. It also has this mount featured very similarly to how I've done it here (I learned from an old, out-of-print book, long ago) and also how to make the mount for a faceted marquise and many other instructions. (I am not affiliated to the author or publisher in any way).
Good luck!
3 comments:
this is great maria. i'm going to try it this way- a bit different from what i do normally. i like it.
sue
Me too! Your tutorials are always so incredible! Thnaks!!!!!
Sonia was onew of my teacher. I di dnot realise she had written a book.
Will have to check it out :)
Post a Comment