
![[Most Recent Quotes from www.kitco.com]](http://www.kitconet.com/images/quotes_special.gif)


 If you haven't heard of PhotoStamps yet, they are (as stated on their website) "an exciting new product that lets you take your own images or photographs and turn them into real U.S. postage." After learning about this great marketing tool on the Jeweler's Resource Bureau website, I recently ordered some with an image of my jewelry and was very happy with the product. What a great branding tool! It increases the cost of your postage by double...but it IS advertising and most advertising is not free!
Wednesday, October 29, 2008
Marketing Tip
If you haven't heard of PhotoStamps yet, they are (as stated on their website) "an exciting new product that lets you take your own images or photographs and turn them into real U.S. postage." After learning about this great marketing tool on the Jeweler's Resource Bureau website, I recently ordered some with an image of my jewelry and was very happy with the product. What a great branding tool! It increases the cost of your postage by double...but it IS advertising and most advertising is not free!


Sunday, October 26, 2008
Etsy Metal Finds
So sorry I missed doing the finds last week! Here are some lovely fall-ish things that I have found on Etsy. I love fall! I included a few extra finds today to make up for missing last week. Enjoy!


Wednesday, October 22, 2008
Tip #15 - Simple Gif Tutorial for photoshop/ImageReady

So I finally have the 'animation' process down. It is quite easy and loads of fun! I am by no means an expert, but its pretty simple. I should mention I am on a mac, so things might be different on a pc. Here's how I made mine:
1. Open up photoshop
2. Open images you want to use.
3. Crop all images the same size - add text if desired, then either flatten the image or 'merge visible' I like 'command E' (shortcuts are my friend)
4. I like to open a new blank canvas to paste them all in to, that way I can save it separate from all of the other images.
5. Copy and Paste each image to that one new canvas - You are creating a layer for each image, but since they are all the same size and opaque, you only see one image, basically just like stacking up pieces of paper, they're all there, but you can only see the top one. (Command A - select all, Command C - copy, click on new canvas, Command V - paste)
6. There is a nice little button in my version of photoshop that is at the bottom of the 'tools' bar "Edit in ImageReady" - it is also under 'File'
7. Image Ready opens up.
8. Make sure the animation window and layers window are both open. If not, go to 'window' and click to select them
9. This is where it started to get a little confusing for me, but once I did it a couple times, its really a cinch. One image, the top image, will appear in the animation window. Depending on how you layered the images and what image you want to have first will depend on the next step. It all has to do with the visibility (that little eye in the layers window). I usually layer mine so the first image ends up being #1 and at the bottom. So I deselect all of the visibility of the layers above it. Now I have the first image in the animation window.
10. To ad the second frame click the 'duplicate' icon in the animation window (should be right next to the trash can)
11. In the Layers window, click to make the second window visible. Now you should have two frames in your animation window with two different images. Continue to duplicate and adjust visibility based on what you want.
12. Once you have finished adding each frame, you need to adjust the time each frame will be visible. You will see a 0 sec under each frame, click the down arrow and change the time. For this animation I did 2 sec - you can experiment to what works best for you and by pressing the 'play' button can have a preview.
13. When you get the timing down, you're ready to save! Go to 'File' and 'Save Optimized As' and you are done!
There is obviously a lot more that you can do and honestly I don't know most of it! But that is the basic on how to make an animated ad! You can upload it to flickr or email simply as you would any other photo. When I first uploaded it to flickr, I thought it hadn't worked, but to view the animation you go to 'all sizes' and then the animation will work.
Monday, October 20, 2008
Weekly Review: Flight of the Conchords
There seems to be a unanimous vote of loving Flight of the Conchords by the Etsy Metal gang...hailing from New Zealand, this terrible twosome bring loads of laughter with their off the wall comedy consisting of mostly bizarre songs. Enjoy!
Friday, October 17, 2008
EtsyMetal News 10.17.08

Victoria and Janos were featured in the Storque for an amazing project they have been working on with several other Flickr buddies. Their work is wonderful and inspiring and the article is fantastic. Its so great that its getting extra Etsy love too!!
Today is my birthday and I'm having a big sale! Check it out here.
Ashley Akers is running two amazing contests! check them out on her blog! Great chances to win some of her fabulous jewelry!
Rachael Sudlow is having a show this weekend, the Maple Leaf Festival in Baldwin, KS going all day Saturday & Sunday.
Shannon is teaching an enameling class! I so wish I could take it. Check it out here.
Thursday, October 16, 2008
Sara Westermark

Sara Westermark is a fabulous metalsmith, who creates modern and organic forms with hints of color. Here is a little peek at this wonderful artist. You can find more of her work in her Etsy Shop.
1. Where do you live, and where are you from?
I live in Wilmington, North Carolina although I grew up in Crystal City, Missouri. I moved to Wilmington shortly after I finished my Master's in Music in Voice Performance.
2. How did you get started working with metal?
I have been drawn to metal because of its permanence. My father was an antique dealer and I loved looking at the craftsmanship of Victorian jewelry. I was curious about how it was constructed and yearned to create modern and unique pieces. My interest in metal became a reality when a few years ago I met a jeweler, Gary Pack. Gary would let me watch him work, talked to me about basic tools, and answered all my questions. He never wanted to be a "teacher" but that is what he ended up being for me. He encouraged me to experiment and figure it out on my own. So I did that. I bought all the books I could afford and read through them all. I try something new all the time. When I am successful with a new technique, I do it 25 times to make the skill more permanent. I guess this is a carryover from my music training.

3. What are a few of your favorite pieces at the moment?
My favorite piece that I have made is my Roman Ruins peridot ring. I was drilling holes in a ring to get a lunar piece, but my drill bit got really dull, and ruined my ring. My husband suggested that I salvage the ring and artistically saw around the ripped open hole in my ring. I did this and added "cracks". I really love how it turned out, but it is definitely a happy accident! This series physically represents my acceptance of change in life. I find beauty in the incomplete, the broken, and in ruins.
I'm building a series around my "roe" stud earrings at the moment. I can't wait to get them finished and list them on etsy. I've made lots of little roe disks and now I'm linking them all together!
I'm also really pleased with how my Ice Towers bangle turned out. It is a study for a ring that I have sketched and want to make.
4. What inspires you (artists, objects, interests)?
I love clean designs, organic and natural forms, contrast of color and texture, and upcycling materials. My daughter has often inspired me. She loves fairies and would pick up pieces of pine straw and string leaves onto them to make a fairy necklace. Then she would announce, "see Mom, why don't you do that in your jewelry?" So I did!

5. Do you have any other artistic interests?
I am a classical singer and I still perform as a soloist (opera, oratorio and art song) locally in addition to teaching a full studio of private students. My students have been very successful and have gone on to schools on full scholarships. (I'm so proud of them). I will be performing as a soloist for the Faure "Requiem", Scarlatti cantata with the Tallis Chamber Orchestra and hopefully a gig with the local symphony orchestra in the spring.
Wednesday, October 15, 2008
Tip #14 - Building up a Setting Seat
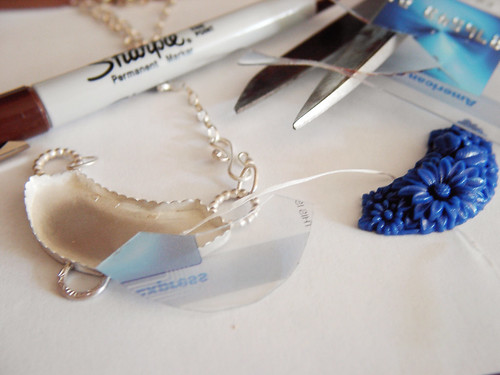
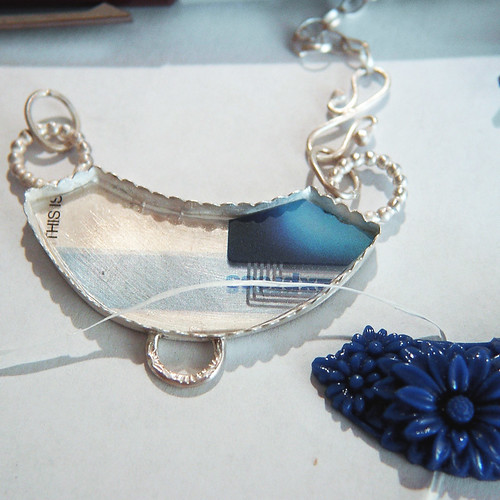
Sometimes when you get your bezel soldered onto your base, you discover that it's too high for the stone you are about to set, or you just want that stone to sit a little higher than it's own hight. You can use just about anything to build it up the seat, but here's a good one that will incorporate your recycling efforts. Save those credit card offers you get in the mail that include a fake plastic card, or use up your spent gift cards.
Simply trace the shape of your cabochon onto the card with a sharpie, cut it out and place into your bezel. Try to avoid the places on the card where numbers or letters are raised, so that the stone will sit evenly on its seat. You can use as many layers of card as needed, and don't forget that dental floss when you're testing the fit (see tip #12). The plastic won't degrade over time like cardboard will, and will leave you a raised, evenly seated setting.
Subscribe to:
Posts (Atom)


