
![[Most Recent Quotes from www.kitco.com]](http://www.kitconet.com/images/quotes_special.gif)


This is very much like the rub-over bezel mount with an open back that I showed you here, but with an elegant taper for faceted stones only and produced with the help of a collet block.

What's a collet block?...it is a steel block with tapered cone-shaped depressions and a matching punch, for stretching tube sections into cone shapes for your mounts, or as in this case for tidying up a pre-fabricated cone shaped setting. These blocks come in different shapes for a variety of mount styles, such as oval.

So, first I made my template and then I marked that onto my metal. I used aabout 0.9mm thick metal, which is quite thick, but you will see why that is, later. How did I get the template right? There are lots of methods listed in so many books on how to do this and they all differ. Here is the way I do it, which you can see in my sketch below;
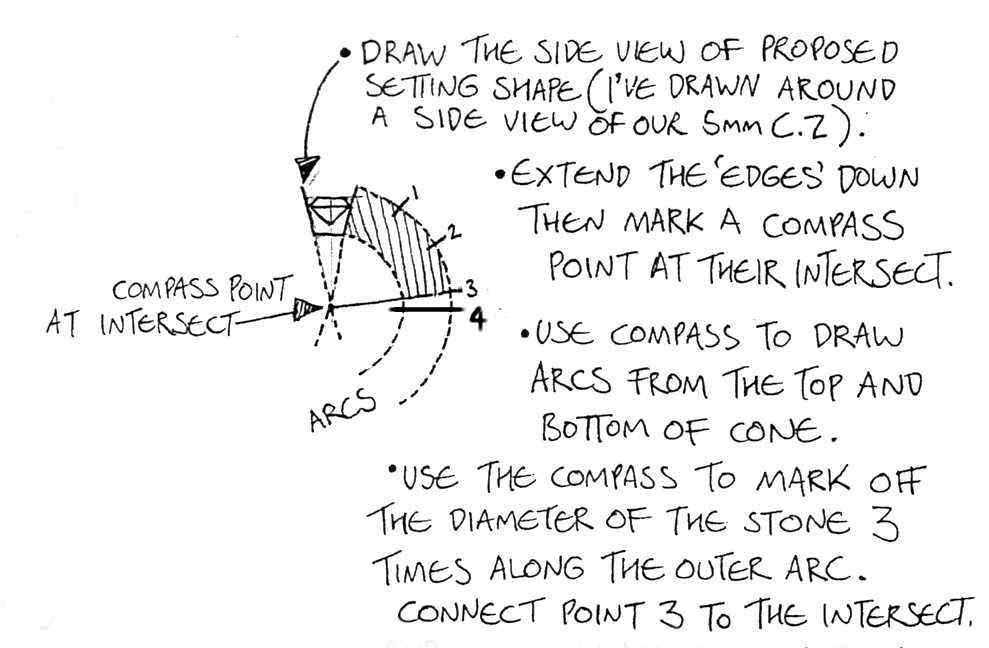
You can see that I have drawn the width of the stone as it actually is, which in this case was 5mm. The two lines which I then brought down (that long "V" down to a point) define the taper of the mount, so a shorter fatter V gives a squat mount and a longer V gives a more tapered, cone. It's helpful after you have drawn the arc, to also add the thickness of the metal you're using, onto that too, so that the final template you cut out is the whole of the shaded section and the extra bit up to where it's marked number 4. This technique works for me every time.

Next, I sawed out the shape and made sure that edges were neat. I used my round nose pliers to bend the shape for my mount around, until the edges met perfectly. Once you have a good flush join, solder it closed with Hard solder. After pickling, you get to put your mount into the collet block and use your punch to true up the form. Which hole do you use though?....well, which one does your stone sit in nicely that leaves the table of the stone a couple of mm below the surface of the block?....choose the next size of hole up from that one.

Now make sure the stone fits the mount. You need a couple of mm proud of the stone table (the "table" is the top, flat surface of the stone). The mount is then soldered into the jewellery item, again with Hard solder.

Now you need to grind away a seat for the stone to sit on, just like we did for this mount. Here in the above photo' you can see that I have coloured in the inside of the mount with black felt-tip pen, so that I can easily see the mark that I have scribed with my dividers which indicates where I will be cutting the seat.


I used both these burrs to grind out the seat. You may find that just one suits you better than the other. Because I have Carpal Tunnel syndrome in my wrists, I find this procedure quite difficult and a little painful, so I tend to grind out a little too much in my quest and for that reason, I prefer to solder a constructed seat into my settings, as in this setting. In this case, I might make another cone to a slightly smaller template and solder it inside. Then I would thin down the top edge of the outer cone, so that it is thin enough to rub over, but for the purpose of this tutorial, I will carry on cutting!....

Further shaping was achieved by using a medium sized, fine flat file, to take the height of the mount down until it is lower than the table but above the girdle (the "girdle" is the widest edge of the stone) so that I have enough metal to rub over. You can see here that the edge of the mount is now nice and thin from having the seat ground down. At this stage in the photo, I still have to take the height down a bit, as there is too much metal to push over.

You can see the ring is now held firmly in the Ring Clamp and I am pushing the edge over from opposite points with my pusher, bit by bit until the edge is snug against the stone all around. Only then do I push any visible lip down against the stone in a downwards push, before finally rubbing around in one direction with my burnisher....just as we did at the end for this setting.

In case you're not sure, this gizmo above, is a ring clamp and makes holding rings while you set stones a much easier job than simply holding the ring with your hand.

So here is the mount after pushing, but before burnishing and below you can see the mount after burnishing.
Job done. Do remember that this is just one way of making this mount, there are variations. Every jeweller has a different way of doing it and has tips to share...good luck!
10 comments:
was quite literally thinking yesterday: "I need to find a tutorial on how to make a tapered setting" and then saw this post in your blog this morning! THANKS! I love this blog.
Magnifico lavoro! Mi piacerebbe tanto sapere cosa usare per saldare il rame?!
wonderful, I've never done this and am delighted to know how you go about it! Thank you!!
Maria, your tutorials are THE BEST!!
thanks maria- this is terrific,
sue
Thanks for this!
Hi I was just wondering what solder did you use and if this is a copper ring? or bronze?
Thanks!
Hi CSfootprints, thank's for your question. I used silver 'hard' silver solder, not too much of it, in the right place, heating the work up correctly to get the solder to flow directly in and through the join via capillary action.
Oh, forgot to answer the question of metal; a copper band and a gilding metal mount (note gilding metal is more bronzey coloured and the copper is more reddish).
So, can you tell us where you bought the collet block? I thought for sure Rio Grande would have them, but it appears that they don't. Is there another name for the tool? Thanks!!
Post a Comment