
![[Most Recent Quotes from www.kitco.com]](http://www.kitconet.com/images/quotes_special.gif)


This week's question came right off the comments section of last week's blog. Linda asked-
"I would like to know how to set a stone in a setting that has wire work soldered across the front." Like this piece by LingGlass on Etsy:

Well, that's a good question Linda.
I'm not sure what is in that setting, it sort of looks like resin, but let's presume it's stone of some sort. When you have something over the surface of the stone, be it a complex wire design such as this, or tabs, or a simple frame, the best way to set this is to BACK SET the stone. There are as many ways to set the stone from the back as there are from the front. The principle is simple, you have something across the front of the stone that keeps it from falling out and you push the stone forward to "set" it from the back. This is exactly the same thing as pushing a bezel or prongs over from the front and the piece on the back keeps it from falling out. Simple. Just think in reverse.
You can make your back settings as simple or a complicated as you like. Here's how I did a simple one-
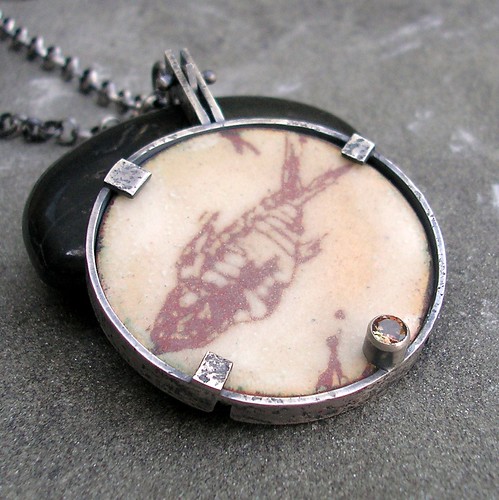
This is the front and the enamel piece is being held in by the tube set gem (which is functioning as a tab) and 3 metal rectangular tabs. Anything you can think of that will cover or partially cover the front of the stone will work. Here's a side view-

What I did here is to make a frame from textured rectangular wire to fit around the enamel/stone and solder the tabs and tube on front. Then I cut little tabs in the side frame and pushed them over the back. Voila! Back set.

You can add a metal plate to your back set to cover the back of the stone if it is unattractive, you could pierce your back plate and make it decorative, you could bezel set a dome for your back plate, or you can leave the back exposed as I did here. You can back set with prongs, tabs, bezels, etc. I hope you can see just how many ways this could be done and have fun designing your own back settings. They can give you so many design opportunities!
We hope someone will ask us another good question for next week. Until then,
Sue and Ann (aka Auntie EM)
6 comments:
I believe the original artist of that pendant is Ling Glass. One of the original Etsy Sellers!
http://www.etsy.com/shop/LingGlass
Thank you sooooo much for explaining it for me! :-D
I've been experimenting with making gem-set bezels, but have been unable to find a satisfactory tool for folding the bezel edge over the stone. There seem to be a variety of tools on the market. Do you have a bezel pusher that you particularly like?
Thanks for your question Dale!! We will answer your question next week! Check back on 10/25.
excellent thank you so much!
not certain but Ling's work looks a bit like a stained glass type of setting. If so, then Low temp wire solder (& a soldering iron) may have been used allowing them to easily incorporate wire work over the front of the (glass) stone/resin.
Post a Comment