Wednesday, February 15, 2012

Taps and Dies....the lowdown.

No, not a dance routine on Strictly Come Dancing, but a way of making your own screws and threads for connecting parts made not of metals or for parts that need to be removable / interchangeable. Here is how to understand it all and how to make them, it's a lot of information so hold on tight!

I'd often wanted to know how to sink my own threaded hole and make a little threaded screw to fit into it. I'd read books that were old, out-of-print and new, but they all seemed to give me only half the information I needed. I looked on websites and found the information to be partial then found a variety of charts and diagrams on the internet, all meaning little to me. I've been asked so many times how to use these things and asked so many times how you're supposed to know which bits to use with what parts....that I bit the bullet and bought a set for about £45 ($69) in order to learn. Actually finding a complete set that I could afford or didn't look cheap and badly made, was another mission in itself. So I'm sharing what I've learned with you;
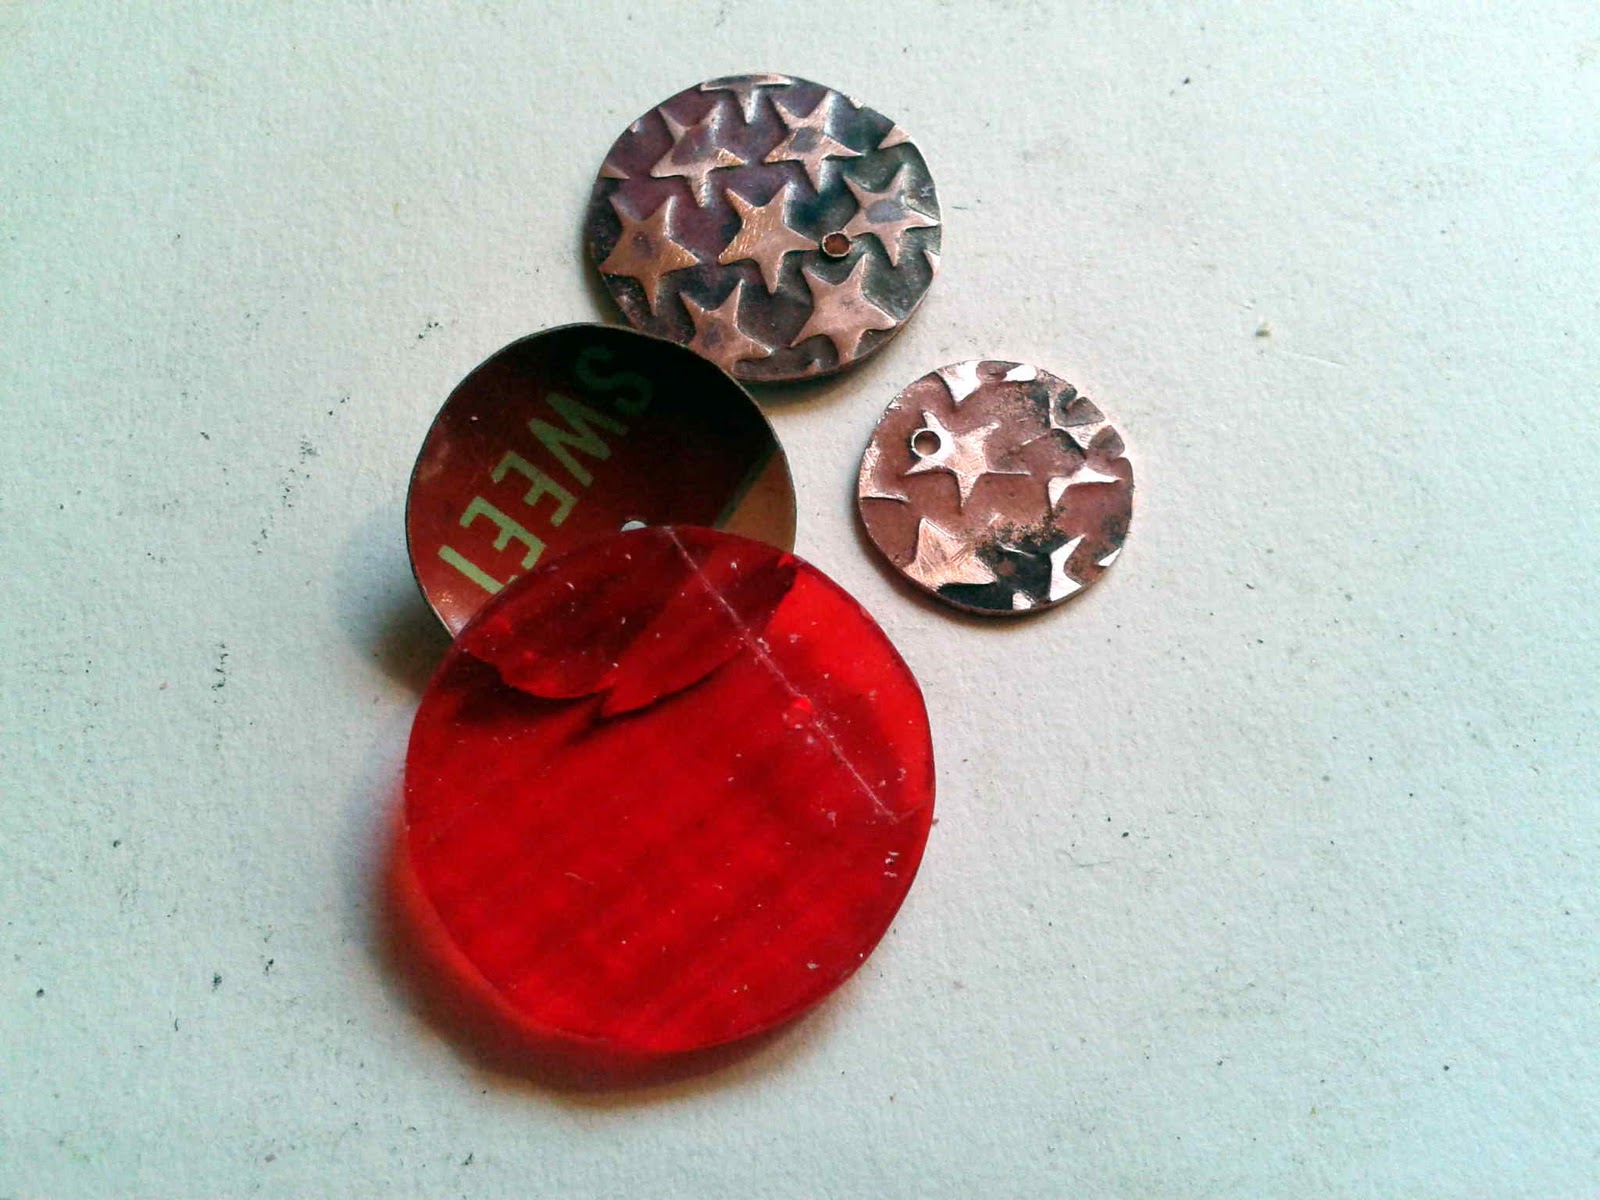

Above are the 4 pieces that I want to screw together. Two pieces of copper, one of old tins, one of perspex.

BA Size
Diameter of wire
(mm)
Diameter of wire
(inches)
Diameter of hole
(mm)
Diameter of hole (inches)
12
1.3
0.051
1.05
0.041
10
1.8
0.071
1.4
0.055
8
2.25
0.089
1.8
0.071
6
2.85
0.112
2.3
0.091
5
3.2
0.126
2.65
0.104
4
3.6
0.142
3.0
0.118
3
4.1
0.161
3.45
0.136
2
4.8
0.189
4.0
0.157
1
5.4
0.213
4.5
0.177
0
6.0
0.236
5.1
0.201


ISO thread size
Diameter of wire
(mm)
Diameter of wire
(inches)
Diameter of hole (mm)
Diameter of hole
(inches)
M1.6
1.65
0.065
1.26
0.050
M1.8
1.85
0.073
1.45
0.057
M2.0
2.05
0.081
1.6
0.063
M2.5
2.6
0.102
2.0
0.079
M3.0
3.1
0.122
2.5
0.098
M3.5
3.6
0.142
2.9
0.114
M4.0
4.1
0.161
3.3
0.130
M4.5
4.6
0.181
3.8
0.150
M5.0
5.1
0.201
4.2
0.165
M6.0
6.1
0.240
5.1
0.201

Above are two charts, one of which you will need to refer to depending on whether you work in "BA" or "ISO" threads. As I understand it, the ISO system is what is most commonly used today across a wide variety of applications, BA is an older system but the main difference is that the depth of cut and angle of the thread is less extreme than on an ISO thread....so if a screw is a little helter skelter at the fairground and the slide twisting around the tower is the thread itself, then how much the twisting slide actually sticks out from the tower and the steepness gradient of the slide, is known as the "pitch". The pitch is smaller on BA threads, which are used on really tiny srews like those on your spectacles. This is more appropriate apparently for using with soft metals like silver, as the pitch is less fragile (doesn't stick out so much and less steep) so less liable to twist or shear off. I could not find a BA set that I could afford so I thought "what the heck" shrugged my shoulders and went for an ISO set. You can buy taps and dies seperately, they are fragile and easy to break but I had no idea what I wanted, neither could I find a tap & die wrench to purchase seperately.


Here are the dimensions of the pieces, I'm using ISO. I had some more or less 2mm wire in stock so looking at the chart (I've highlighted the bit I looked at) I could see which tap and die size I needed to select. The wrench came with a circular 'washer' which is removable and is for holding the smaller taps and dies.

I have removed the washer (shown above with a smaller size die so you can see what I mean) and inserted the M2.0 that I needed into one of two tap adapters that came in the set (look again at my first picture at the top of this post, there are 9 dies, 18 taps {2 of each}, 2 tap adapters, 1 wrench and a die adapteradapter (one adapter is for the M1 sizes and the other is for the M2 sizes), then making sure it's in nice and vertical, tighten the screw with a flat-head screwdriver.


Next, I took the copper disc that I wanted the thread cut into and taped it onto a block of wood. I had previously drilled a hole with a 1.6mm drill bit (see the chart again). The metal part should not be less than 2.5mm thick, this piece was about 3mm thick. Slowly and carefully I turned the wrench clockwise with a little pressure after having first applied a bit of lubrication on the tap (I only had wax but oil is more appropriate). I was careful to keep the tap perpendicular to the piece I was cutting into. I turned one whole rotation then turned back out half a rotation to let out the swarf. I kept on going in this way until I had cut a thread right through the disc.....it took about 5 minutes.

Hopefully, if you look closely you can see the thread cut into my disc.

Next, I needed to cut my wire so that it became a screw. I picked up the M2.0 die (see the chart). You can see how one side has the size printed onto it and the other might be plain flat or dished. Notice the notch in one side of the disc for locating against the screw in the wrench.

I needed the adaptor for holding the die which just pops in. I inserted the die and tightened the screw, you can see above the printed numbers just peeking out from under the adaptor. Notice that tightening the screw would make the centre of the 'clover leaf' squeeze down to a smaller size, the centre is where the cutting thread is.

Next I inserted the wire into a vice, making sure the wire was vertical. Then with the printed side of the die facing up I fitted the other side onto the wire in the centre of the 'clover leaf'. This side of the die hole is slightly champfered to accept the wire. Then I started to turn the wrench clockwise and after quite some considerable time, got absolutely nowhere. After lots of faffing about trying different things and wondering if the die, my digital callipers or the chart was inaccurate, I found in one of my books the instructions...."the wire needs to be just about able to fit into the die before you tighten the screw"......not exactly engineering accuracy talk, so I drew the wire down to a narrower gauge which just about almost not quite fit the die, down to 1.80mm, even though the chart says the wire needs to be 2.05mm. Trying again, the die cut beautifully, one turn of cutting, half a turn back to remove swarf and lubrication on the wire...over and over again. I still don't know why the original thickness of wire was too much, as all charts have the same number info on them, perhaps I squeezed my callipers too tight on the wire....

You can see that I've cut quite a way down the wire and the start of the wire is now screwed up out of the top of the die.

Above you can clearly see the wire has now got a thread cut onto it. How about that!

I sawed a section of the wire off leaving an uncut couple of mm at one end then soldered the uncut end to a head. I soldered that end on with a gap of no thread because I didn't want solder flowing up the thread and filling it up. The other end I slightly rounded off with a file and emery paper so that it feeds nicely into the threaded hole we cut earlier.
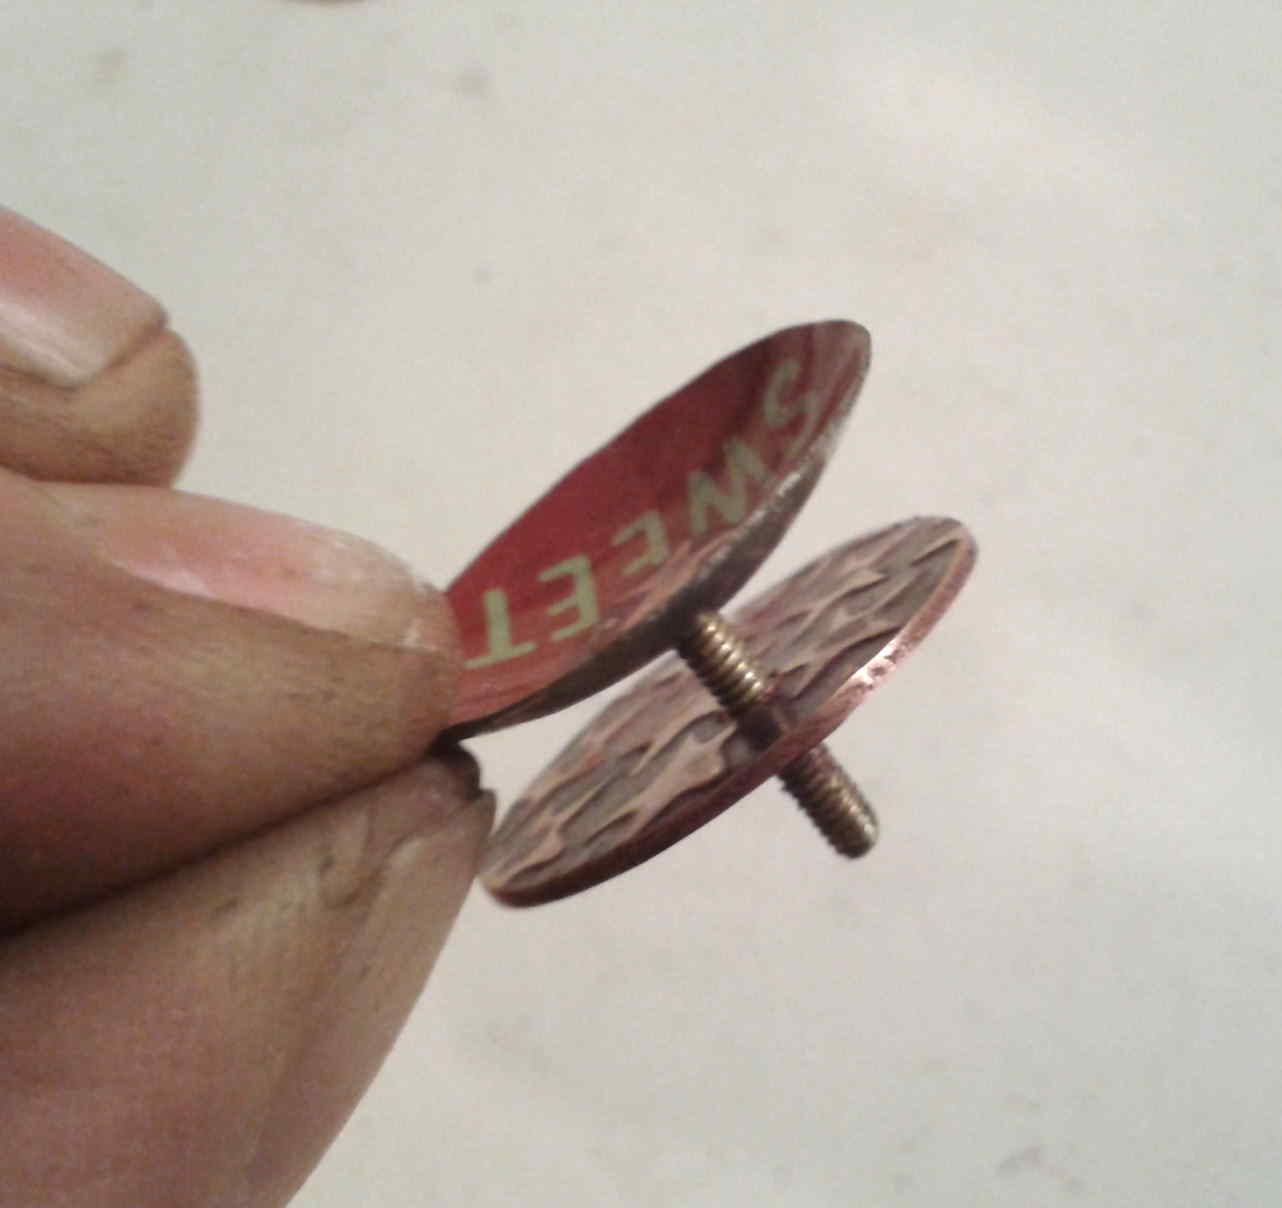
A moment of triumph, the screw threads nicely into the disc. It threads through an uncut hole in my bit of dished tins material....

...and through my perspex disc which is also cut with a threaded hole, then into a threaded disc of metal at the back. Hurrah!

Great. But what if you want to cut a threaded hole which doesn't go all the way through your material? You'd be using a thicker material for starters. The hole would be known as a "blind" hole. Ah, well you can see that the taps I have used are tapered, so how would they cut all the way down to the 'bottom' of a hole? You would need to buy taps called 'bottoming' taps, also known as 'plug' taps in the same size as the tap you use to cut most of the hole, so in the case above I would have had two or three plug taps in size M2.0, each tap would have a taper which is less severe than the one you use before it and so gradually cuts a thread into the last few mm of the hole you have drilled. I have seen taps for sale called "plug taps", so if I ever use any of these I will show you what happens. 

Tuesday, February 14, 2012

Ask Auntie EM - How do I get a mirror polish?

Howdy! It's Tuesday and we are back again answering your questions in EtsyMetal's weekly blog post called "Ask Auntie EM". If you're new here, this is a weekly blog post written by Sue and Ann where we tackle your metalsmithing and non metalsmithing questions. Having trouble with your solder? Need some help with stone setting? Have a problem 2 year old? We and EtsyMetal's 100+ members probably have the answer. If you'd like YOUR question answered in the future, please email your questions to askauntie@etsymetal.com and we will get to it as soon as we can. Speaking of questions, I want to thank all of you who submitted questions this week! We got a lot of excellent material for future blog posts! Keep checking back every Tuesday, it might be your question we are answering! If you'd like to read past posts, they can be found here.

OK, let's get to this week's question. We got this a few weeks ago from Pennee:

"I do have a question about finishing. There are so many options now- 3M wheels, silicon wheels, bench polishers- what are the best steps and products to get that professional looking mirror finish?"

This is an excellent question and one that gets asked a lot. I learned how to polish the easy way...I got a job as a goldsmith and was more than inexperienced. The first job they gave me was polisher so you either learned or got fired. As I needed the job, I figured things out really quick. Polishing can make or break a piece. Experienced polishers can keep edges crisp and get into every nook and cranny without leaving a mark. Inexperienced polishers turn a great piece into a gummy looking mess, leaving drag marks and rounding off every corner and ruining prongs or other settings.

The first thing to remember when going for a high polish is to think ahead. As a piece is being assembled, think, "will this need to be shiny later? Will it be accessible to polish when the piece is assembled?" If the answer to the second question is "no", you need to prepolish. This is an intermediate step before the piece is completely assembled where you would polish components before actually soldering everything together. Prong heads and ring shanks are two examples of components that should be prepolished.

The second thing to remember is that you will cut your time at the polishing station DRAMATICALLY if your piece is properly prepared. For this, I love two products. First, I adore Cera Wheels. I learned about these as a goldsmith where, if a product doesn't work well it doesn't get reordered. These work so well and last so long, they are worth the money. I use all the grits and order the largest barrel shape. I have two of each, one for keeping flat, the other for shaping with a file to any particular shape I might need.

These will bring the inside of a ring up to almost a mirror shine. They are good mostly for inside ring shanks but I have used them on other curved surfaces. The second product I am in love with is 3M polishing paper. This stuff is amazing, it has cut my polishing time in half or more. I have two sheets of this as well, one that I keep whole to sand flat areas on a desktop and one that I cut in strips to use on small pieces by hand.
My only beef with this stuff is that it's almost impossible to tell which grit is which because it's not marked. I finally used a big sharpie to mark each sheet for easy identification. There are some big gaps between some of the grits but you can get VERY close to a mirror polish with these if you don't have access to polishing equipment.

So, now your piece is prepolished and well prepared for the final polishing. Now what? I know there are lots of metalsmiths out there who use their flexshaft to polish. I am not one of those people. I learned on a real polishing wheel and I have never gotten good results with just a flexshaft. I am lucky enough to have a tool hoarder husband so I have a modified bench grinder to polish on. There are LOTS of products out there to polish with but I use the same method I learned at the jewelry store. I start with tripoli on a stitched muslin buff and then move to rouge or Zam on a softer muslin buff. If I have to prepolish, I use a brush on a mandrel attachment. There are so many options for buffs, here is a very simple breakdown:

1. Felt laps: Unless you are a VERY experienced polisher, I'd stay away from these. They scare the bejeepers out of me because they can completely ruin a piece in about 2 seconds. If you're good with them, they are like magic. They will keep edges VERY crisp and they work fast.

2. Treated, stitched muslin buffs: These are good for the initial polishing with tripoli. They are hard so be careful. Light passes with very little pressure work best. These will keep most edges crisp but will also wear a piece down very fast. They should never be used anywhere near prongs or delicate details.

3. Stitched muslin buffs: These are good, all purpose buffs that can be used for tripoli or final polishing with rouge or Zam. The stitching keeps the layers of muslin together so you get some firmness which will keep some edges crisp. These may need a little more pressure to get a polish but don't ever press hard or you will get drag lines.

4. Balloon Cloth Buff: These are for final finishing only. They will round over a piece quickly if used with a more aggressive compound. These are great for organic pieces or pieces where a crisp edge doesn't need to be achieved.

5. Detail Brushes and Inside Ring Buffs: These are for getting into tight spots and inside rings. For detail brushes, you use this mandrel to hold small brushes and load them with compound to get into teeny tiny spaces. The first time you use the mandrel, screw it onto your spindle by hand or you'll burn yourself. Rings can be polished with these but load them the first time onto the spindle the same way.

There are so many types of compounds out there too and I have mentioned the few I use but I would advise you to call Rio's tech support and ask them about all the different kinds they sell. I just don't have enough experience with them to write about them. If you don't have an ultrasonic, there are a lot more water soluble compounds available now that would rinse off a piece with just soap and water.

OK, so now you know all about what to use but how the heck do you use it? I shot two very short videos that are lame, I know. But I wanted to show you how to polish. When you polish use a VERY light touch. With tripoli, I just keep lightly running the piece over the buff, I never linger for more than a second. With rouge, you can use more pressure and time but keep the piece always moving.

Here is how I use tripoli with a hard buff:


And here is how I use Zam with a loose balloon buff:


ALWAYS polish on the bottom 1/4th of the wheel, between 6:00 and 4:00. Never go higher or lower than those two positions. Hold on tight, wear a dust mask and have proper ventilation. Safety goggles are not a bad idea either. Above all else: NEVER POLISH A CHAIN, EVER. Chains need to be polished by hand only, unless you want to loose a finger. Pieces get HOT when you polish so take breaks often. Once you polish a lot, your fingers will toughen up and it won't be so bad.

So, I think that's enough for this post. I hope I demystified polishing enough for you to give it a try yourself if you can. It's an excellent skill we should all have, even if we don't always use it. If you make a trip to your local jewelry store, if they have a goldsmith on the premises you could also ask for a demo. Most jewelers are happy to pass their knowledge on if you don't take up too much time.

Thanks for checking in this week! Remember, email your questions to askauntie@etsymetal.com and we will get to an answer as soon as we can!

Saturday, February 11, 2012

“What’s New”

This week was so "short" for me and here I am again to show you what our team members did this week.
Enjoy our new creations !

12
tkmetalarts                                              experimetal
34
 fluxplay                                                   lsueszabo
56
betsybensen                                           Rebecca Bogan
78 
Art By Winona                                       Michele Grady Designs
910
e5jewelry                                                  2Roses
1712
SCJ Jewelry Design                              Erin Austin
1314
 nova of sweden                                     Gotham Atelier
1516 
Silentgoddess                                          iacua

I will back next Saturday with another beautiful collections,
Inbar

Thursday, February 9, 2012

Charm Swap 9 Update

I have so many progress photos to share this week! Let's get right down to business.

Konstanze from nodeform shared this photo of what her charms are going to be modeled after:


She says this about her charms, "I modeled a charm I kind of like. Looks like a type of cocoon. I had to tweak it for a while to get it to be thick enough for stainless steel printing. The stainless steel will have a printing texture and will not be highly polished as the rendering shows it."


Next update is from Sue from lsueszabo. She has a really cool story of how she came up with her design:

"I was trying to figure out what I would make and was walking about in my woodland garden after an ice storm just to get inspired. It is really beautiful with the ice covering all the branches and pods. I was literally almost struck by the idea! My big Tibetan steel garden bell all of a sudden broke the branch it was on in the tree and it came crashing down right in front of me. I picked it up and was trying to find another branch to support it when it occurred to me that THIS WAS IT. I made these little versions for charms."


Sue is the second person to finish all of her charms! Some of us (won't mention any names...) haven't even started.


Mark from markaplan is working on a dragon design for his charm. He says he is working to adapt the this design into a charm and that it is still a work in progress:


I can hardly wait to see his finished charms.


Some of us are struggling with deciding on our charm designs, some of us are in the working stages of creating our charms and some of us are all done! We have just over a month and a half until our due date. It is sure an exciting process and I love being able to bring our participants' progress to you each week.

Until next time...

Tuesday, February 7, 2012

Ask Auntie EM - A plea for questions!

Here we are again, it's Tuesday and today's the day for Ask Auntie EM. That would be great, except Auntie EM is running out of questions. Yes, there is only one question left in our in box, a wonderful question about achieving a high polish, and we'll tackle that next week. This week, we are writing to ask YOU (yes, you) to help keep us going by asking us questions. So far, we have had all metal related questions, which is great, but we are a team of over 100 members with far reaching expertise and experiences. We can answer questions on LOTS of things! Without questions, Auntie EM can't go on and we wouldn't want that, would we?


If you've been a regular reader, you know the drill...but for those of you who aren't regulars, you can email your fabulous questions to askauntie@etsymetal.com and we'll get right to them! You can reread all our previous posts here so you're not asking a question that has already been answered...and then email us! Cooking, travel, child rearing, running a business...ask away and we will try our best to get an answer to you! Thanks for keeping Auntie EM in business!!!

Until next week, Happy metalsmithing from Sue and Ann!

Monday, February 6, 2012

EtsyMetal Blog Carnival 2.6.2012: "Who would you like to see wearing your jewelry?"


Welcome to the February, 2012 Blog Carnival!


Topic this month:

Who would you like to see wearing your jewelry?


Have a look at EtsyMetal member's blogs and see what they have to say on the subject:


Enjoy!!
Related Posts Widget for Blogs by LinkWithin
 
>