Tuesday, April 8, 2008

Maggie J's Jewelry

I have been a big fan of Maggie J's Jewelry since I first joined Etsy. I love the organic quality that she brings to her work. Maggie utilizes many techniques to create texture and interest in her pieces. Her use of unusual gemstones and mixed metals add contrast with color as well.

I am the proud owner of a pair of Maggie J earrings.

Maggie J Earrings

They were custom made for me and inspired by this pendant that I saw on her flickr page.


A similar pair of earrings is available here.

She was a delight to work with and the earrings are even better in person.


Maggie is the proprietor of her own brick and mortar jewelry shop. I asked her a few questions about it and here is what she told me:

The name of my shop is Maggie J's Jewelry, and I opened on October 2, 2006. It is located in a small community of artisan studios and shops called the Riverwood Shops, in historic Dillsboro, North Carolina. The other studios/shops are Riverwood Pottery, Kathie Roig Hand weaving, Pig and Penguin - a children's clothing boutique, Riverwood Menagerie - Tiffany-style stained glass art, and The Oaks Gallery, a large gallery representing many regional and national artists. There is also a small restaurant amongst us, called the Well House Deli.

This year, the Riverwood shops celebrated its 50-year anniversary. The Morgan family in 1957, the same family that founded Penland School of Crafts, founded it. The Riverwood Shops is still owned by the Morgan family today.

My shop is open year round, Monday through Saturday, 10am-5pm. I sell mostly the same work in both shops; however, I have a much wider selection in my "real" store.


So if you are ever in the area please swing by and tell Maggie that Ashley is loving her earrings!

Saturday, March 22, 2008

Heat Coloring Copper


Heat colouring copper is a very experimental and unpredictable process, determined solely by the temperature of the metal. One of the main things to remember is to go slow, and to heat the metal slowly to achieve the colours you want. The Copper will go through a series of gold, orange, pink, purple, dark blue, and light blue, before turning black. Here are some tips on how to go about this process successfully:

  • Cut and shape your piece of copper
  • Complete all shaping
  • BE SURE TO FINISH ALL AREAS WITH EMERY (SAND) PAPER BEFORE COLOURING. Any areas not cleaned properly will turn a brown colour, and you will have to clean the whole piece and start over.
  • Holding the metal in soldering tweezers, preferably with the tweezers holding as small a space as possible, start “painting” the metal very slowly with the soft flame of the torch. You really only want the tip of the flame to "lick" the metal, and can even heat it from a bit further away. Be very careful and do this gradually and slowly, removing the flame frequently to check the colour. If you heat past the colour you want, you will have to re-emery the surface and start over.
  • The metal should turn a gold colour, then orange, pink, purple, dark blue, and light blue. Because the process is so unpredictable, it is normal for parts of the metal to turn one colour and not cover an even surface, although this can be manipulated with small amounts of heat.
  • Once you reach the colour you want, remove the flame and blow on the piece of metal, to slow the process of changing colour. The colour may or may not change in this step, so it is advisable to watch the colour closely and remove the flame prior to the metal changing to the colour you want.
  • Place the copper piece aside in a place where heat will not reach it. Be careful that you place it on a clean surface—otherwise you may end up with solder or other dirt sticking to it and ruining the piece.
  • Many people have inquired about what to coat the pieces with to prevent the colour fading or oxidizing. I have tried wax and it has completely removed the colour. It has been recommended at http://www.finishing.com/2600-2799/2662.html that you use an oil-based polyurethane coating. I do not coat my pieces as the colour seems to hold up well, and have tried polyurethane coating, which made the piece turn orange.

Wednesday, March 19, 2008

Jewellery Show March 27th in Vancouver Canada

click image for larger view or view invite on flickr

'Like Wearing a Love Letter'.
Jewellery by Colleen Baran

Opening Night March 27th 6-8pm
Come by and say hello!
For those of you in Vancouver, Canada, See the work in person, eat some chocolates, read love stories and submit your own!
Ongoing March 28th-May 4th

Crafthouse Gallery
1386 Cartwright St.
Granville Island, Vancouver BC
V6H 3R8
www.cabc.net

In the ‘Like Wearing a Love Letter’ series I wanted to make jewellery that was like a love letter. Like wearing a daydream, a memory or a thought of love. Little stories of love that are: sincere, ironic, deep, passionate, conflicted, uncertain, comfortable, simple, adoring, platonic and complicated.

More photos to come on www.seeseebe.blogspot.com

Sunday, March 9, 2008

Stacking rings ala János

This tutorial by János Varga was originally posted on Flickr.


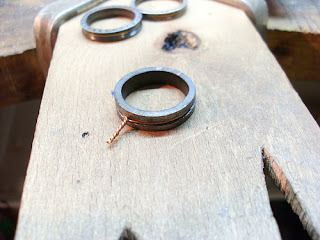
These are my first stacking rings. The idea came from Chris. They are iron rings with brass, silver and copper inlays.


STEP 1: I started with an iron water pipe. Here in Italy (and also in Hungary) they used to make the water pipes from iron. They are just about normal ring sizes, and they are a good quality of iron. Here I have cut the groove for the inlay.


STEP 2: Then I cut off a section, here it is.


STEP 3: I twisted a piece of copper (brass, silver) wire into the groove.


STEP 5: At this point I have cut off the twisted bit of the wire.


STEP 6: I hammered the ends into the groove.


STEP 7: Then I hammered the ring at the part where the wire was twisted to close the inlay.


STEP 8: Between the stages I annealed the whole piece. Also, at the end the oxidation from heating gives contrast between the grooves, the dots, and the shiny surface.


STEP 9: With a punch and an old chisel I made the patterns.


STEP 10: I filed off the edge of the ring because the inlaid wire disappeared under the iron. Then comes a careful finish with all of it's stages.

Finished!

Thursday, February 28, 2008

Handy Tip!


I print most of my postage online, but those good old fashioned stamps still have their use. To keep them sorted on my chaos of a desk, I use little 35mm film cannisters to keep them rolled up.
To do this, all you need to do is slice a little slit in the side of each & then thread the roll of stamps through, allowing you to pull out what you need. Easy peasy!

Martha Stewart gone EtsyMetal!


Congrats to two of our members Kathryn Riechert and Elizabeth Scott who will have their pieces featured on the Martha Stewart show on Friday Feb. 29th - there will be several other fabulous Etsy shops featured as well, but we are so proud of our own we just had to share!! There is an article about the feature on the Etsy website - Storque Article - Its wonderful to see some great press about Etsy and most importantly our special gals!

Thursday, February 21, 2008

Initial Necklace by Alicia Istanbul

I had to post this necklace by Alicia Istanbul (one of our new members) which just arrived yesterday. It's going to be my new favorite. It's 3/4" with a nice rolo chain, made of sterling and fine silver. Thanks Alicia :)
Related Posts Widget for Blogs by LinkWithin
 
>