Friday, November 4, 2011

Project Accessory: Season 1-Episode 1 "Accesorize This?"


This Weeks Challenge:

Project Accessory Challenge
Tweleve designers arrive in New York to compete in the first season ever of Project Accessory! The were taken to a warehouse in New Jersey and given 30 minutes to rummage through two storage units full of "junk" to gather materials for the challenge. They were challenged to make a necklace, belt and an accessory of their choice to go with a white t-shirt and jeans.

EtsyMetal Challenge
The challenge for the designers was to create something fabulous out of junk. We all have a junk drawer in our house. (I have four!) The drawer with the "junk" we save for no apparent reason. So go dig through the junk drawer and find the fabulous to create an accessory of your choice to pair with a simple t-shirt and jeans. Necklace, earrings, bracelet, belt, or handbag...it's up to you! Limit yourself to ONLY what is in the junk drawer for materials. No materials from the bench except glue and paint. Of course, full access to all of your tools.

Here are the submissions:


For this first PA episode I was not at home and couldn't bear to miss this first challenge. So trying to be a good guest (not really, I just wanted the rusty metal) I cleaned my friends roof of all the rusty its' and bits I could find! It's a win-win for everyone Smile hee hee. I decided this would just have to do for my "junk drawer items."
I then set them out, I did not use snips or pliers, but only just my fingers and bent and wrapped them together. I wanted to incorporate more of the pieces but I didn't want to bust out any "real" tools, I was feeling a bit lazy I have to admit, and I wanted to see just what would materialize. I picked up 2 paintbrushes (which I snipped the heads off) the day before from the "flea" market (literally I have gotten all bitten up! ha-ha!)
I used scraps of embroidery thread and some super glue, and there we have it!


Experimetal
(Second Submission)
This second submission was made impulsively, it is made up of a plastic coffee lid, white quartz gravel (from the roof) and the "jewelers four letter word."


Silent Goddess
Took me about 2 seconds to find perfect makings for earrings for this first challenge. These little brass escutcheons came off of an antique baker's cabinet I bought at a local antique mall. They had put them behind the crystal knobs and took away from the overall look of the cabinet. When I opened my junk drawer I immediately thought they would make kickin' earrings to be worn with jeans and a tee.


Nina Gibson
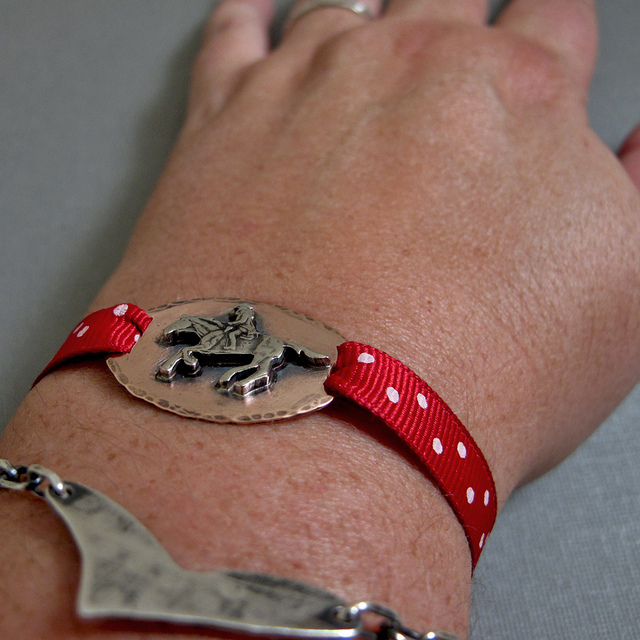
I found a Delaware quarter and an old penny in my junk drawer. I cut out the horse rider from the quarter, rolled out the penny and soldered. I also found a bit of ribbon left over from a Valentine's Day bag of cookies and a washer to turn it into a bracelet.


Rummaging through the junk drawer gave me an opportunity to actually "clean" the junk out. I settled on a brass bookmark, nintendo charger cord and an acrylic star to create my accessory.

And for next week...
Project Accessory
Sole Searching
Season 1~Episode 2


Aired: 11/3/11, 10pm/9ct
View Episode here: http://www.mylifetime.com/shows/project-accessory/video/full-episodes


Project Accessory Challenge
The designers were given the classic little black dress as the canvas and 10 minutes to grab a finished piece of jewelry as inspiration from Swarovski Crystal Store. They were challenged to make a complimenting "adjustment" to the inspiration piece, pair of shoes and an accessory of their choice. Quite a challenge for only episode 2!

EtsyMetal Challenge
The challenge for EtsyMetal will be to create a pair of complimenting earrings to go with one of the designers pair of shoes from the show. (We have got to have a bit of a challenge too!) You can view the shoes here: http://www.mylifetime.com/shows/project-accessory/season-1/rate-the-runway/episode-2#rate

Now go be creative!

Submissions due: 12 midnight pst Next Thursday, 11/10/11.


**guidelines for guest submissions**
Please read this every week as there may be small updates and changes. The pieces you submit must be pieces that are made specifically for that weeks challenge. Then post a link to your challenge creation in this weeks comment area before the deadline.
*We only are accepting guest submissions from our blog comment area at this time, insert your links there. Then please cross-post this to your Blog, Flickr, Etsy, etc. And tag them with "EMPA 1.2". We will post your name with a link and a picture of your piece on our blog. Thedeadline for guest submissions will be Thursday at 12 am (midnight), Pacific Standard Time. The new blog posts and the new challenge will go up the Friday after the new episode airs.


Thursday, November 3, 2011

CS9 Update

All is pretty quiet on the CS9 front this week. I am thinking that must mean that all of our participants are busy at their benches working on their charms!

I did want to report the arrival of the CS8 Charm Bracelet in the EtsyMetal store.


This one of a kind charm bracelet is such a work of art!


50% of Proceeds from this sale of the CS8 charm bracelet will benefit The Fleisher Art Memorial in Philadephia, PA. Please visit the EtsyMetal store to see more photos of the CS8 charm bracelet, learn more about the Fleisher Art Memorial and purchase individual CS8 charms.

Until next time...

Wednesday, November 2, 2011

November Challenge–“November Symbols”

Our November Challenge due to October 31st was
November Symbols

1a

2a

3a

4a

Our December team challenge is very special.
The challenge due date is November 30.
“Thailand is currently facing its worst flooding in 50 years. Floodwaters have swamped more than two-thirds of the country, submerging complete towns. Hundreds of lives have been tragically lost. Rice fields and businesses of millions of families have been severely impacted.”
The Ganoskin Project Needs our Support!
EtsyMetal team challenge for November is:
Create a charm for a charm bracelet. The bracelet will be for sale on EtsyMetal shop.
All will be donated to help the Ganoskin Project !
Thank you !!!

Tuesday, November 1, 2011

Ask Auntie EM - Sweat soldering

By now we hope you have heard about the new weekly blog post called "Ask Auntie EM". Ann Hartley of Hartleystudio and, Sue Szabo of lsueszabo , will be answering YOUR questions in a weekly post we are calling "Ask Auntie EM". EtsyMetal has over 100 members with vast amounts of knowledge and far reaching interests and capabilities. We figured if we couldn't answer your questions...someone on the team could! "What can we ask?" Great question! Ask anything! Metalsmithing, enameling, raising, stone setting, cooking, childcare, travel...you got a question, we probably have an answer! We will choose questions from comments in the previous week's post so post a question this week! Email your questions to askauntie@etsymetal.com and YOUR question might get answered next week!

This week it's me, Ann Hartley, answering a question from last week's comments. Shirlee asks:

"I'd like to suggest sweat soldering for one of your next topics ... i have a lot of practice at this yet I still find it difficult."

I wrote to Shirlee and asked her what specific problems she was having and she wrote back:

-too much solder, not enough solder
-air pockets under part of the sheet
-sometimes the little piece cracks before the solder flows
-takes so long to reach flow temp that there's a lot of fire scale
-solder refuses to reflow (flowed 1st on the back of the top piece) even if pickled in betwen soldering steps. perhaps i need to file the solder flat?

These are all common problems and I hope I can help Shirlee and some of you who are having problems sweat soldering. I know that Shirlee has a Smith mini torch so that's what I used. I will admit, it's a pretty small flame and you couldn't sweat solder anything too large or too thick with it. For this tutorial, I used a small sterling silver disc, about 1" in diameter and 24g, and another sterling disc, 1/4" in 24g as well. I needed to make a thank you gift for a friend and an initial pendant was just the right thing.

So, let's look at this first mosaic, above. In photo #1 you will see the two pieces I'm going to solder together. The smaller disc has been stamped with the initial "E" and then flattened so it's relatively flat. The larger disc is given a texture with a hammer and is also flat. Since I'm using a small torch, I used the trick I talked about in a previous post here about building a furnace to retain heat. I don't usually do this but it worked great for this project! When I'm sweat soldering I'm no hero...I use easy solder. I have done a lot of this type of soldering and I find that medium and hard are just asking for trouble. Don't be a martyr, use easy solder. I use enough to completely coat the back of what I'm soldering and I use a titanium solder pick to spread it evenly over the surface, see photo #3. There is no reason to file anything flat, if you spread it around, it's flat enough. When I'm ready to solder, I use Firescoff flux. I LOVE firescoff flux for many reasons but when I'm sweat soldering I particularly love it because it doesn't bubble or get slimy. For years, I used other fluxes and, as I heated my two pieces, they would slide all around and I had to use a tweezers to gently and repeatedly nudge them back to where I wanted them to go. Not anymore. I spray the bottom piece with a fine mist of Firescoff and then place my top piece where I want it to go, see photo #4. Now, will my top piece move a little? Maybe but not much and not at the crucial moment when the solder flows. You may need to take a fine tipped tweezer and give your top piece a nudge but probably only as you begin to heat and only once. I'm tellin ya, that firescoff is worth every penny.


So, now I start heating the bottom piece evenly. I go around and around the bottom piece, heating it evenly and never really heating the smaller piece on top. In picture #5 you will see that the small disc has settled down onto the larger disc and it's sitting right where I want it. I will stay right there until the solder flows. I will now heat this piece until the solder flows and you will see that little flash around the edge of the piece you're soldering. What I don't have a picture of is step #5 1/2 where the solder didn't totally flow out to the edge in one spot...I just hit that little spot with my torch and the solder flowed right to the edge. Then in picture #6 you can see that the solder has completely flowed around the edge of the initial disc. This picture is from before it's pickled. In picture #7 you can see the piece after it's pickled and you can see that the solder has flowed all the way around. Well, you can't see all the way around...but trust me, it is. Every once in a while, I will pickle and see that the solder didn't flow all the way to the edge. That's frustrating for sure. You can fix that by pickling and then refluxing and reheating. When the solder flows, you can *very gently* press the top piece. Don't press too hard or you'll leave a mark. Air bubbles along the edge are frustrating too. The are usually caused by dirt trapped in the flux trapped in your solder. You have three options to fix this...you can either try to soak the piece in the ultrasonic, you can use a tiny ball burr to grind the dirt out and then, in both cases, reflow the solder...or if they are really tiny you can try to burnish them out. I have found that the magical Firescoff really has taken care of both of these problems, the incomplete flow and the air bubbles.

In photo #8 I show a photo of the tweezer I use to nudge the top piece here and there until it's in the correct place. The tips are really fine and can be easily resharpened. I try to keep them as cool as possible so they don't stick to the flux when I go in for corrections.

I also checked with Sue and she had this to say about sweat soldering:

I actually almost always sweat solder with hard but that is usually cause it's an early step in the construction of a piece for me and I don't want it to slide off. I don't have any problem- I just make sure to heat the bigger piece, sometimes from below if necessary. I construct things to support the larger piece in the air so I can get heat under it if I need to- IE the piece sitting on stacks of nickels or pieces of broken firebricks. Another trick I use is to white out the top of the smaller piece- I have had solder flow onto the top of the small piece and if it's filigree or a textured piece, it's toast cause you can't file it without destroying it. To prevent that, I use a solder stop like white out to keep the top really pristine. Also, as a last resort, if you have a gap on the edge you can re-flux and put a tiny chip right in that spot and re-solder. Yes, you'll have to clean that spot up but it's better than a gap and it usually will fill it in.

So, two metalsmiths, two different techniques. I think, with practice, you can get the right amount of solder, the right amount of heat and the right touch to make sweat soldering easy.

So this week we answered Shirlee's question...next week it could be YOURS! Please email your questions for us to askauntie@etsymetal.com. Thanks for checking in....we'll see you next week!!!

Sunday, October 30, 2011

MEMBERS' NEWS FOR THE MONTH OF NOVEMBER

Well, as usual, the members of the Etsy Metal team are busy this month. Here's what some of us are up to in November-

Danielle Miller-Gilliam's "Ridge Collection" will be represented by llyn strong fine jewelry at SOFA in Chicago, IL from November 4-6. SOFA: Sculpture Objects and Functional Art Fair is a gallery-presented, international art exposition dedicated to bridging the worlds of design, decorative and fine art. You can see the "Ridge Collection" by clicking on the link.

Danielle Miller-Gilliam will be at the Atlanta Contemporary Jewelry Show in Atlanta, GA on November 4 & 6
.

Jen Lawler Designs will be participating in an invitational art show called "Art On The Prairie" in Perry IA. The dates are November 12-14th.

Jen Lawler Designs will also be participating in the Black Friday Market Day Event on November 25th from 9-2.

Meg Auth is a featured artist for the month of Nov at CircaArts Gallery in South Bend IN. She will be presenting a new collection of jewelry incorporating Lake Michigan beach stones entitled "Stoned Love". Gallery opening is Nov 11.

Lena Echelle is at the Atlanta Contemporary Jewelry Show November 4 and 5.


Lena is also teaching thorn setting in a one day workshop called Thorn Theory 101 at the Spruill Art Center in Atlanta
. Click on the link for more info.

Beth Cyr
changed her shop name! bcyrjewelry is now just BethCyr.

Andrea of Amuck will have jewelry in the exhibition titled "From Minimal to Bling:Contemporary Studio Jewelry" at The Society of Arts and Crafts in Boston, Ma. Nov.4-Dec. 30 2011.

Andrea would also like to announce that she is a member of Susan Lenart Kazmer's Ice Resin design team for the next year.

Well, that the November happenings here folks. Stay tuned, the members of Etsy Metal continue to make the news...

Sue

Saturday, October 29, 2011

Project Runway: Season 9; Episode 13 - "The Final Challenge"

This Week's Challenge:
"Finale, part 1 & 2"

Project Runway Challenge:
The remaining designers are working on their final collections to be presented at Mercedes Benz Fashion Week, and must present a three-look mini-collection to present to judges.

Our EtsyMetal Translation:
Create a mini collection in any variation of pieces! Feel free to draw on previous challenges to inspire, or create something completely different!

Here are the final Submissions for Season 9:

My collection was created using the poor-man's raising technique. I don't have the right tools for doing raising so I improvised and used my rawhide mallet, my vise, my set of dapping punches and my ball peen hammer. But first I patterned my copper with my rolling mill and a scrap piece of raw canvas. I wanted to give the metal the feeling and flow of fabric. The three pieces turned out to be wonderfully lightweight yet sturdy!
I am thinking that they would all coordinate with any of Anya's designs this season.

For my take on the challenge, I wanted to do something that represents my style so I've used materials that I love to work with, Nevada boulder turquoise, pearls, and a rose cut diamond. Done in sterling silver with touches of 14kt and 18kt gold, the collection includes a pendant, earrings, and a ring.
Guest Submission

New Challenge:
Accessorize This?

Due: 12 midnight pst Next Thursday, 11/3/11

Project Accessory Challenge:
Twelve designers arrive to New York to compete in the first season ever of Project Accessory! They were taken to a warehouse in New Jersey and given 30 minutes to rummage through two storage units full of "junk" to gather materials for the challenge. They were challenged to make a necklace, a belt and an accessory of their choice to go with a white T-shirt and Jeans.

EtsyMetal Challenge
The challenge for the designers was to create something fabulous out of junk. We all have a junk drawer in our house. (I have four!) The drawer with the "junk" we save for no apparent reason. So go dig through the junk drawer and find the fabulous to create an accessory of your choice to pair with a simple t-shirt and jeans. Necklace, earrings, bracelet, belt, or handbag...it's up to you! Limit yourself to ONLY what is in the junk drawer for materials. No materials from the bench except glue and paint. Of course, full access to all of your tools

**guidelines for guest submissions**
Please read this every week as there may be small updates and changes. The pieces you submit must be pieces that are made specifically for that weeks challenge. Then post a link to your challenge creation in this weeks comment area before the deadline.
*We only are accepting guest submissions from our blog comment area at this time, insert your links there. Then please cross-post this to your Blog, Flickr, Etsy, etc. And tag them with "EMPA 1.1". We will post your name with a link and a picture of your piece on our blog. Thedeadline for guest submissions will be Thursday at 12 am (midnight), Pacific Standard Time. The new blog posts and the new challenge will go up the Friday after the new episode airs.
Now Go Be Creative!

“what’s New”–This week in our shops

20
  1. Shae Freeman
  2. LSueSzabo
  3. Sarah Hood Jewelry
  4. Rebecca Bogan
  5. Michele Grady Designs
  6. 2Roses
  7. Nodeform
  8. e5jewelry
  9. hartleystudio
  10.  Cynthia Del Giudice
  11. Maria Goti Joyas
  12. Jennifer Lawler
  13. markaplan
  14. simplymega
  15. Panicmama Jewelry
  16. lichenandlychee
  17. NRjewellerydesign
  18. Inbar Bareket
Related Posts Widget for Blogs by LinkWithin
 
>